
Excuse the alliteration; it couldn’t be helped! Crispy Coconut Cups just might be my newest no-bake confection obsession. If you can use a microwave to melt chocolate, then you’ve got this one in the bag! Make this recipe your own by easily switching up the ingredients to create new flavours too!

If only my daughter read my blog regularly, I’m sure she would be quite impressed by my unintentional use of alliteration in the title of these Crispy Coconut Cups. She’s in her second year at university where she’s majoring in English Literature and double minoring in History and Philosophy. I’m not bragging; just having a proud dad moment! Anyway, her workload is heavy, which is why she doesn’t read my posts often. It’s easy to forgive whenever she calls to tell me she prepared one of my recipes.
This is a no-bake recipe. Not only is it perfect for the busy student who might be attending a potluck, a class social, or even inviting a few friends over to her apartment for a holiday movie night; it’s also perfect for anyone who just does not have time to bake. Even if you don’t consider yourself to be a skilled baker, you can easily prepare these – I promise!
Make your own online recipe box!
Click the in the lower right corner of your screen
& follow the quick and easy instructions!
I love recipes like this! Honestly, Dear Reader, it takes about 5 minutes from start to finish. Who doesn’t have at least 5 minutes to spare? These are quick, easy, and taste great. In this version, I’m using white chocolate because I wanted the red and green Rice Krispies to pop. But, if I had used regular Rice Krispies, I would have used milk chocolate, because I absolutely love milk chocolate!
Once you put aside the 5 minutes it takes to prepare these Crispy Coconut Cups, the fridge does the rest of the work for you. Pop them into the fridge for at least 30 minutes to firm up. Pop them out of your mini muffin tins and plate. It really doesn’t get any easier!

NO-BAKE RECIPES
I used to think that the term no-bake meant that a recipe was more of an assembly-type recipe. Something like a salad, for example. It sounds simple enough, right? Toss the lettuce and any other veggies you want into a bowl. Top it with cheese, croutons, avocado, hard-boiled egg, etc. Add some dressing and you’re all done! But, no-bake actually just means no baking. There still might be some stove-top cooking needed – or even a microwave, for that matter.
To prepare these Crispy Coconut Cups, you will need to use your microwave. So, even though they’re no-bake and kid-friendly, you will still need some way to melt the chocolate. And, if you don’t have a microwave, you can melt the chocolate in a double boiler. I guess since that’s just stove top, these could still be considered no bake!
Some other no-bake-type holiday recipes you might enjoy are these Rudolph’s Red Nose Cookies. Hairy Moose Droppings are delicious and always quite the conversation starter! Just like these Caramel Peanut Slices were a favourite of my mom’s so were these Marshmallow Coconut Balls and so were these Christmas Crunch Cookies. You can find many more no-bake cookie recipes here at Lord Byron’s Kitchen by using the search field at the top of this page.
Looking For More Christmas Confections?
Lord Byron’s Kitchen has more than enough to satisfy your sweet tooth! Click on the links below to see a countdown series of holiday recipes from that category!
LORD BYRON’S 12 SNACKS & TREATS OF CHRISTMAS
Another holiday series, Lord Byron? Yes – why not!? Welcome, Dear Reader, to my last Christmas series this holiday season! I’m calling this series Lord Byron’s 12 Snacks & Treats of Christmas. Unlike the 24 Cookies of Christmas series that ended a few days ago, this series will focus on easy-to-make snacks and treats that are both delicious and festive.
I will try to keep the recipes in this series quick and easy too. Most of them will require the help of a microwave rather than an oven. And, a bunch of them will involve more assembly-type tasks rather than preheating, beating, whipping, etc.
Just like every other series that I’ve shared here, this series will also see a new snack or treat recipe shared with you, Dear Reader, each and every single day for the next 12 days – even on Saturday and Sunday! You might be asking yourself, how many Christmas recipes could one possibly have or need? Well, I say you can never have too much of a good thing. And, I love having lots of choices. Who wants to prepare the same holiday snacks and treats year after year?
SUBSCRIBE NOW SO THAT YOU NEVER MISS OUT ON NEW RECIPES!
So, welcome, Dear Reader, to Lord Byron’s 12 Snacks & Treats of Christmas! Fresh off of my 12 Edible Wreaths of Christmas, my 12 Bars and Squares of Christmas series, and Volume 5 of my annual 24 Cookies of Christmas series, I’m ready to plow through the next 12 days with you once again.
You really don’t want to miss one of these recipes, so if you have not yet subscribed to Lord Byron’s Kitchen, I encourage you to do so. That way, a new recipe will be emailed to you every day. You won’t have to bother to come looking for it! Like in previous holiday recipe countdowns, I like to mix up the recipes in the series so that there is something for everyone. Are you ready!!??

INGREDIENTS NEEDED TO PREPARE THIS RECIPE
The following is a list of the ingredients needed to prepare this recipe. For exact amounts and measurements, refer to the printable recipe card located near the bottom of this post.
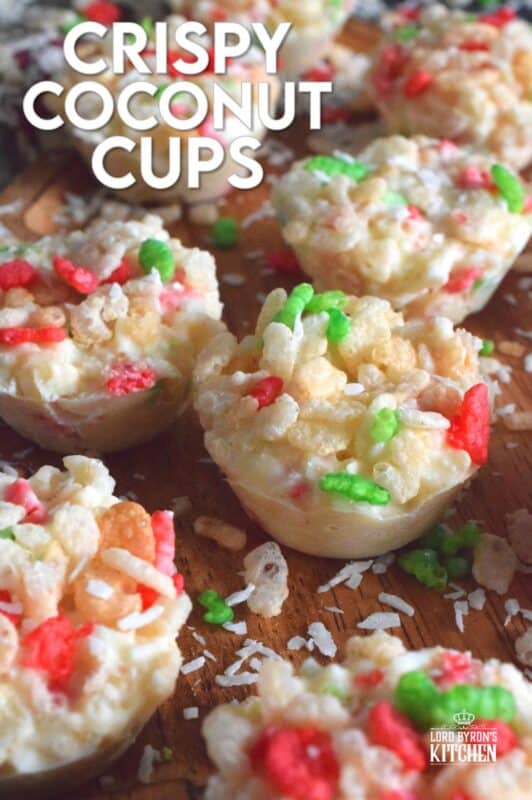
- Chocolate Chips – I used white chocolate chips here because I wanted the red and green Rice Krispies to pop. You can use milk chocolate, semi-sweet, or even dark chocolate.
- Vegetable Shortening – This is used to thin the chocolate. You can also use coconut oil, but it will change the flavour of the chocolate slightly. Since this recipe has coconut in it, that wouldn’t be a bad thing at all, come to think of it!
- Rice Krispies Cereal – Just about everyone is familiar with this. Who could ever forget the craze of the snap, crackle, and pop figures from our childhood?
- Coconut – Be sure to buy the right type of coconut. Read the next section for more details.
- Non-Stick Cooking Spray

THE TYPE OF COCONUT IS IMPORTANT
When it comes to coconut to bake with, there are two kinds – sweetened and unsweetened. Those two types can be found in different levels of fineness and coarseness. It’s important to use unsweetened coconut for this recipe. Otherwise, with the addition of the chocolate chips, these Crispy Coconut Cups may be too sweet to eat!
You’ll want to use unsweetened coconut. The size of the shredded coconut won’t make a difference to the taste, but it certainly will make a difference to the overall look. The longer shreds of coconut might make for a messier bite, which is no big deal, but longer shreds can be a pain when spooning the mixture itno your mini muffin pan cavities. You want your delicious cups to look just as amazing as they taste!
Depending on the brand, some coconut is shredded, grated, or desiccated. Shredded usually refers to larger pieces, while grated tends to be smaller. Desiccated has nothing to do with the size of the pieces but means the coconut is dried or the moisture has been removed. In most cases, you will find a fine or medium grade. Medium is my personal coconut of choice in most cases and it is what I used here.
HOW TO MAKE CRISPY COCONUT CUPS
Lightly coat a mini muffin pan with non-stick cooking spray and set it aside. You do not need a lot of non-stick cooking spray at all! Place the white chocolate chips and the vegetable shortening into a microwave-safe bowl. Whenever you microwave chocolate, you should microwave on medium power for 30 seconds. Then, if it’s still not silky smooth, microwave in increments of 5 or 10 seconds, depending on your microwave, stirring with a rubber spatula after each increment.
Once the chocolate is fully smooth, add in the Rice Krispies and the coconut. Stir well with a rubber spatula until the mixture is well combined. Spoon the mixture into the prepared mini muffin tin. Evenly distribute the mixture between the muffin tin cavities. You should get 12 cups, so feel free to use a spoon to gently push the mixture down into the cups.
At this point, you can top the Crispy Coconut Cups with a sprinkling of Rice Krispies. I only did this because I had Christmas-themed red and green Rice Krispies and I wanted the cups to be more colourful. Alternatively, you could use candy sprinkles too.
Once done, transfer the muffin tin to your fridge. Allow the mixture to firm up in the fridge for at least one hour. To remove the cups from the pan, use a butter knife or a mini offset spatula and gently push it between the cup and the side of the muffin tin cavity. This will loosen the chocolate from the sides of the pan and you can pop them right out.
Lord Byron’s Annual Christmas Cookie Series
Did you know that Lord Byron’s Kitchen has been sharing a 24 Cookies of Christmas Series for the past several years? Click on the links below to see all of the recipes from each series on one page!
STORING, PACKAGING, & FREEZING
When it comes to most snacks and treats, they taste best at room temperature, but they don’t hold up well to being left out on your countertop for long periods of time. They will stay fresh in a cookie jar or food-safe container with a lid for 3-5 days if left to sit on your kitchen countertop. You can store them in a food-safe container in your fridge. When you want one, two, or half a dozen, take them out of the container and place them in a single layer on a plate. Let them sit at room temperature for 5 minutes and they’re ready!
If you plan to freeze your Crispy Coconut Cups, you certainly can! Pile them into a clean, food-safe container. The container must be freezer friendly! You’ll want to ensure a very tight-fitting lid too. I use these quite often when freezing baked goods. I like to place a sheet of plastic wrap over the top of the container before pushing the lid on. This helps to create a better seal. The goal is to keep all of that freshness locked in!
You can freeze these cups for up to three months. If you plan to give previously frozen cups as a gift, I would lay them out on a wire cooling rack to thaw completely. If packaging, wait until the condensation has evaporated. Once thawed, pile into cellophane bags and tie with a ribbon, or stack in a cookie tin/box.
With all of that said, you really don’t need to freeze snacks and treats, because for the most part, they are ready in very little time and you should easily be able to prepare them the day you plan to eat them or serve them to guests.

QUESTIONS?
If I have not answered all of your questions in the text above, don’t hesitate to reach out to me! You can contact me by sending me a message in the comments section further down the page. I will try my best to answer as soon as possible! You might reach me even faster by following me on Facebook and sending me a private message. Scroll down to follow me and never miss another recipe!
Finally, as I stated previously, every day I will be posting a new recipe. If you miss one, don’t fret. You can find my entire collection of Christmas Recipes right here! There are over 200 Christmas recipes and counting. There’s something for everyone! Cheers!
Do You Like This Recipe?
You should consider trying these other delicious recipes too!


Crispy Coconut Cups
Ingredients
- 1 1/4 cups white chocolate chips
- 1 teaspoon vegetable shortening
- 1 cup Rice Krispies Cereal
- 1/2 cup unsweetened coconut
Instructions
- Lightly coat a mini muffin pan with non-stick cooking spray and set it aside. You do not need a lot of non-stick cooking spray at all!
- Place the white chocolate chips and the vegetable shortening into a microwave-safe bowl. Whenever you microwave chocolate, you should microwave on medium power for 30 seconds. Then, if it’s still not silky smooth, microwave in increments of 5 or 10 seconds, depending on your microwave, stirring with a rubber spatula after each increment.
- Once the chocolate is fully smooth, add in the Rice Krispies and the coconut. Stir well with a rubber spatula until the mixture is well combined.
- Spoon the mixture into the prepared mini muffin tin. Evenly distribute the mixture between the muffin tin cavities. You should get 12 cups, so feel free to use a spoon to gently push the mixture down into the cups.
- At this point, you can top them with a sprinkling of Rice Krispies. I only did this because I had Christmas-themed red and green Rice Krispies and I wanted the cups to be more colourful. Alternatively, you could use candy sprinkles too.
- Once done, transfer the muffin tin to your fridge. Allow the mixture to firm up in the fridge for at least one hour.
- To remove the cups from the pan, use a butter knife or a mini offset spatula and gently push it between the cup and the side of the muffin tin cavity. This will loosen the chocolate from the sides of the pan and you can pop them right out.
Notes
Nutrition
Did you make this recipe?
Upload a photo and tag me so that I can see it!


Amy Liu Dong says
This is so cute and looks delicious!
This is perfect for Christmas desserts or gifting!
Jamie says
Totally love this treat recipe, looks yummy! Plus, for me, any food that comes with coconut will definitely have an amazing taste. The color and texture are great. Perfect for this Holiday season!
Zhen says
This was so good no one could believe it only needed 4 ingredients!! Everyone asked for the recipe so I sent them your way!
byronethomas@gmail.com says
Thank you! 🙂