
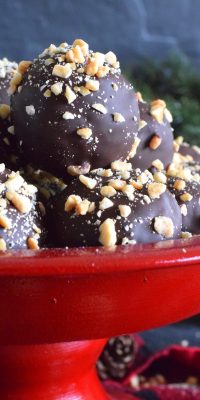
Dipped in melted milk chocolate and topped with chopped, salted peanuts, Crispy Peanut Butter Truffles are a delicious confection that not only melts in your mouth, but the inside has an airy and crispy bite from the Rice Krispies Cereal, peanuts, and chocolate chips. This truffle is for the serious peanut butter and chocolate lover!

What is a holiday truffle countdown without one that has peanut butter in it? Crispy Peanut Butter Truffles were one of my favourites in this entire series. I absolutely love peanut butter, so that’s probably why. But, I also liked the contrast of the creamy peanut butter and the melted chocolate with the crispiness of the Rice Krispies cereal. These are just so easy to make and so delicious!
Oftentimes, these are referred to as Peanut Butter Balls, but to me, they’re a truffle. If I have to roll a mixture into balls and refrigerate it before rolling it into balls and then dipping it into melted chocolate, then it’s a truffle! But, unlike most truffles that are soft in the center, or can be completely dissolved on the tongue, these have Rice Krispies Cereal, chopped, salted peanuts, and chocolate chips stuffed into them.
Let’s jump right into what you will need to make these truffles, but first, let’s just talk about this truffle series. Today is the twelfth and final recipe in Lord Byron’s 12 Truffles of Christmas series. I’d like to say that I saved the best for last, but that’s not the case at all. I tested so many recipes, but these 12 are the ones that made the cut. They were the easiest and most delicious. Did you have a favourite? If so, scroll down to the comments and let me know!
Make your own online recipe box!
Click the in the lower right corner of your screen
& follow the quick and easy instructions!
HERE IS WHAT YOU WILL NEED FOR THIS RECIPE:
- Peanut Butter – Use smooth peanut butter or the chunky kind with pieces of peanuts in it. I have not tested this recipe with natural peanut butter and to be frank, I don’t think natural peanut butter will work without some adjustments.
- Butter – I used salted butter, because I knew it would cut the sweetness just a tad. The butter will help to loosen up the peanut butter, making it easier to mix in the rest of the ingredients.
- Confectioner’s Sugar – This is what gives the truffle its sweetness and creaminess. When the confectioner’s sugar is combined with something moist, like butter and peanut butter, it basically melts, which in this case, creates that creamy, melt-in-your-mouth texture!
- Rice Krispies Cereal – Just about everyone is familiar with this. Wasn’t it, after all, the breakfast of champions in the 80s?
- Mini Chocolate Chips – These are added to the truffle mixture to add more chocolate and texture. You can leave them out if you wish.
- Peanuts – Salted, chopped peanuts add texture and flavour to the center of the truffle and also make a great sprinkling option!
- Milk Chocolate – Milk chocolate is a great choice for these truffles. They complement each other quite well.
- Vegetable Shortening – This is optional, but will thin out the chocolate if you want a thinner chocolate coating.

Looking For More Christmas Confections?
Lord Byron’s Kitchen has more than enough to satisfy your sweet tooth! Click on the links below to see a countdown series of holiday recipes from that category!
LET’S TALK PEANUT BUTTER!
Before you are tempted to send me an email or a comment knocking my choice for peanut butter that is not natural and organic, hear me out! This recipe will not work with natural peanut butter. I repeat, this recipe will not work with natural peanut butter. There, I said it. Now, if you go ahead and make this recipe using natural peanut butter and it comes out a big, wet mess, you cannot blame me.
John.e uses only natural peanut butter, but I do not. I do not like it at all. Yes, it’s healthier and better for me, but I’d rather not eat it at all if I have to choose the natural stuff. I grew up on Kraft or Jiffy peanut butter and it’s the only peanut butter I ever use.
For this truffle, you have the choice of smooth peanut butter or crunchy. But, you do not have a choice between all-natural and the sugar-laden, mass-produced stuff. The truffle will not hold together properly and it will be almost impossible to roll into balls. Mostly, it certainly will not taste right. If you are completely against using non-natural peanut butter, as harsh as it may sound, this recipe is most certainly not for you.

HOW TO MAKE CRISPY PEANUT BUTTER TRUFFLES:
Let’s just get this one thing out of the way first, because I’ve said this in every truffle post in this series. But, it’s important and worth repeating! Even though truffles are super easy to make, they do require a little bit of patience. I’m speaking of course about the time it takes for the truffle mixture to set up in the fridge before they can be rolled into balls. It’s one of the things I hate the most when it comes to baking! I can’t tell you how many times I refuse to make a recipe because I have to wait for something to chill. I have no patience, I tell you! Ha! This recipe needs at least two hours of refrigeration time!
Now that I’ve made you aware of that, let’s prepare the truffle mixture. First, place the peanut butter and butter into a large saucepan. Over very low heat, stir the butter and peanut butter together until melted together. DO NOT attempt to do this quickly over high heat. Low heat is the best way to go to avoid scorching the peanut butter. Once they are melted together, remove them from the heat.
Add in the confectioner’s sugar and stir until well combined. Set the saucepan aside and allow the mixture to cool for 10 minutes. Next, add the Rice Krispies Cereal, the chopped peanuts, and the chocolate chips. Fold into the peanut butter mixture until well combined. Cover and refrigerate for 30 minutes.
When firm, measure out a tablespoon of the mixture. Roll into balls and place on a parchment-lined baking tray. Once all of the balls are rolled, place the baking tray in the fridge for 2 hours. It’s always best to dip truffles into chocolate after they have had some time to chill in the fridge. If the mixture is too soft, return it to the fridge for a while longer.

THE BEST WAY TO COAT TRUFFLES IN CHOCOLATE!
I used to think that perfectly dipped chocolate truffles were witchcraft! Of course, I’m kidding, but honestly, I could never master it. Either the chocolate was too thick, or not smooth enough. And, I was always left with a pool of chocolate at the bottom of the truffle that would harden. There’s nothing wrong with extra chocolate, but I so badly wanted to make my truffles look better.
I tried that fancy little tool for dipping things into chocolate. It’s like a two-tined fork with really long tines. Apparently, the truffle is supposed to balance on there, while the thin tines allow the excess chocolate to drip off. Lies! There is no fancy tool needed to get perfect chocolate-dipped truffles. All you need is melted chocolate with good consistency and two toothpicks. Here’s how I did it.
If you use melting chocolate right out of the bag, like candy melts or chocolate chips, for example, you will end up with very thick chocolate. The thicker the chocolate, the longer it will take to harden, which means more time for it to run. Thin your chocolate by adding a teaspoon of coconut oil or butter to the bowl before you start to melt it. This will thin it without any risk of your chocolate seizing or compromising the flavour. In this case, I’m using vegetable shortening, because it has no flavour and will not interfere with the taste of the peanut butter.
Lord Byron’s Annual Christmas Cookie Series
Did you know that Lord Byron’s Kitchen has been sharing a 24 Cookies of Christmas Series for the past several years? Click on the links below to see all of the recipes from each series on one page!
DIP, LIFT, TAP AND TOOTHPICKS???
Working with chilled Crispy Peanut Butter Truffles, which I keep refrigerated until the chocolate is ready, I insert a toothpick about 1/3rd of an inch into the truffle. Dunk the truffle into the bowl of chocolate and gently move the toothpick in a circular motion so that the entire truffle is enrobed. Carefully lift the truffle out of the chocolate and slightly tap the toothpick on the rim of the bowl. The excess chocolate will fall back into the bowl.
I cannot stress enough the importance of using a chilled truffle center. The coldness will help to harden the chocolate right away. The rest is just semantics! With a second toothpick, run it very gently under the truffle to wipe away the excess chocolate. Do not press against the truffle; just wipe against the dripping chocolate.
Next, transfer the truffle to the prepared baking tray. You should still be holding the toothpick sticking out of the truffle and the truffle should be sitting on the parchment paper. Using the second toothpick, push it gently into the hole where the first toothpick is standing. Gently twist the first toothpick between your thumb and finger to loosen. Pull the toothpick up and out. Finally, remove the second toothpick, and use it to carefully smooth the still melted chocolate over the hole.

WHEN ALL ELSE FAILS, GARNISH!
I had to practice quite a bit to get truffles looking their best. Even now, there are sometimes when I’ll run into a problem and they don’t turn out as nicely as I’d like them too! I learned a long time ago from watching re-runs of Julia Child’s cooking series that garnish can cover up little mishaps. There’s a running joke in my family that parsley is my best friend because I love to garnish everything!
Even if you dipped the perfect truffle, it’s still nice to add something to the outside of it. As you can see in the photographs, I garnished the truffles with chopped peanuts. Not only does it look better, but it also covers any holes left behind by the toothpick! Also, it tells everyone what is in the truffle. This is especially important if you have a holiday platter with more than one type of truffle!

STORING, PACKAGING, AND FREEZING
When it comes to Holiday Buttercream Truffles, they taste best at room temperature, but they don’t hold up well to being left out on your countertop. Store them in a food-safe container in your fridge. When you want one, two, or half a dozen, take them out of the container and place them in a single layer on a plate. Let them sit at room temperature for 5 minutes and they’re ready!
If you plan to freeze these truffles, again, pile them into a food-safe, freezer-friendly container. You’ll want to ensure a very tight-fitting lid too. (I use these quite often when freezing baked goods.) I like to place a sheet of plastic wrap over the top of the container before pushing the lid on. This helps to create a better seal. The goal is to keep all of that freshness locked in! You can freeze these for up to three months. Enjoy!
Do you have a question or comment?
Would you like to leave a review?
Scroll down to the comment section and write me a message.
I will personally respond as soon as possible!
THAT’S ALL FOLKS!
So, there you have it! Lord Byron’s 12 Truffles of Christmas is now complete. Over the past 12 days, I have shared truffle recipes that are chocolaty, coconutty, boozy, lemony, cakey, etc. Now, it’s up to you to choose which truffles you will make to share with your family and friends this holiday season.
Soon, I will publish a complete list of the truffle recipes, but for now, I think I’ll take a little break. By little, I mean two days. Because, would you like to know what happens on Monday???? Would you???? Okay, I’ll tell you! On Monday, my newest Christmas baking series will start. I’ll publish the first recipe from Lord Byron’s 24 Cookies of Christmas Volume 4!! On top of the existing 100+ holiday recipes here at Lord Byron’s Kitchen, I’m adding 24 brand new recipes this year.
I’ll see you back here on Monday, right? If you can’t wait, be sure to check out all of my Christmas recipes here. And, if you love Christmas as much as I do, you can read about our annual Christmases here and take a look at our decorations and our traditions too. Enjoy!
Do You Like This Recipe?
You should consider trying these other delicious recipes too!


Crispy Peanut Butter Truffles
Ingredients
- 1 cup peanut butter
- 1/4 cup butter
- 1 cup confectioner's sugar
- 3 cups Rice Krispies Cereal
- 1 cup chopped, salted peanuts
- 1/2 cup mini chocolate chips
- 2 cups milk chocolate chips
- 1 teaspoon vegetable shortening
Instructions
- Place the peanut butter and butter into a large sauce pan. Over very low heat, stir the butter and peanut butter together until melted together. DO NOT attempt to do this quickly over high heat. Once they are melted together, remove from the heat.
- Add in the confectioner’s sugar and stir until well combined. Set the sauce pan aside and allow the mixture to cool for 10 minutes.
- Next, add the Rice Krispies Cereal, half of the chopped peanuts, and the chocolate chips. Fold into the peanut butter mixture until well combined. Cover and refrigerate for 30 minutes.
- When firm, measure out a tablespoon of the mixture. Roll into balls and place on a parchment-lined baking tray. Once all of the balls are rolled, place the baking tray in the fridge for 2 hours. It’s always best to dip truffles into chocolate after they have had some time to chill in the fridge. If the mixture is too soft, return it to the fridge for a while longer.
- Place the milk chocolate chips and the vegetable shortening into a microwave-safe bowl. On medium power, microwave the chocolate for 30 seconds. Remove and stir. Continue to microwave in 15 second increments on half powder until chocolate is smooth. Stir between each increment.
- Working with chilled truffles, insert a toothpick about 1/3rd of an inch into the truffle. Dunk the truffle into the bowl of chocolate and gently move the toothpick in a circular motion so that the entire truffle is enrobed. Carefully lift the truffle out of the chocolate and slightly tap the toothpick on the rim of the bowl. The excess chocolate will fall back into the bowl.
- Next, transfer the truffle to a baking sheet lined with parchment paper. Top with the remaining chopped peanuts.
- Continue to coat all of the truffles in the melted chocolate. Once done, transfer baking sheet to fridge until chocolate is firm.
- Transfer to food safe container. Keep refrigerated.
Nutrition
Did you make this recipe?
Upload a photo and tag me so that I can see it!


Janelle says
I have made this basic recipe (sans mini chocolate chips) every year since I was a kid, and now it is the one recipe my kids say they will NOT allow me to miss at Christmas. They call them peanut butter balls, and it’s the first goody gone from the table when everything is set out. SO good!! 🙂
EDWARD KOWALSKI says
Is it okay to use any puffed rice cereal or must it be the Rice Krispies brand? You didn’t mention a brand name for ant other ingredient, so I was wondering the requirement for a specific brand of cereal?
byronethomas@gmail.com says
You can certainly use another brand. I refer to all puffed rice cereal as Rice Krispies. 🙂
Pat says
Are these dry roasted peanuts chopped up????
byronethomas@gmail.com says
Yes.
Lynn says
🤣 😂
I just love your blogs! I could not agree with you more about natural peanut butter. It’s disgusting. Completely and utterly disgusting.
Peter Pan hasn’t killed me yet. I get so sick of reading comments about how unhealthy something is. If you don’t like it, you don’t have to make it and you also don’t have to berate those of us who do. I’m thin and healthy but NO ONE is going to make quit eating sugar. lol
Your recipes are incredible btw. Absolutely love your website.
byronethomas@gmail.com says
Thank you, Lynn. 🙂 And, thank you for the laugh!