
Quick and easy Mint Candy Melts is the perfect last-minute, no-bake confection. Package these beauties in little cellophane bags and tie with a festive ribbon to give to friends and neighbours. These would make a lovely take-home goodie bag too!

Talk about an easy, no-bake recipe!! These Mint Candy Melts are just that! Not only are they stunningly gorgeous – yes, food can be gorgeous! – but, they are minty and chocolatey too. I saved these mints for the last recipe in this series, because they were one of my favourites in the series, and they just might be the fastest and easiest to make!
This is the second minty recipe that I shared with you this Christmas. Remember the Mint Patty Thumbprint Cookies? Those were delicious too! Well, there was my Double Chocolate Peppermint Cookies too, so those can be added to the mix for mint/peppermint lovers. Come to think of it, I have quite a few minty recipes here at Lord Byron’s Kitchen. So, if you can’t get enough mint, just click here and see them all!
Make your own online recipe box!
Click the in the lower right corner of your screen
& follow the quick and easy instructions!
LORD BYRON’S 12 NO BAKE CHRISTMAS TREATS
At the beginning of this series, I said that I am a sucker for punishment, because I was starting another Christmas series this year. But, I really enjoyed this one. You know how much I love to cook and bake, but until I really explored no-bake options for Christmas, I did not realize that I could enjoy being in the kitchen without actually turning on a stove!
With these Minty Candy Melts, Dear Reader, my fourth Christmas series this year is coming to a close. Just in case you missed it, here is a quick recap. First, I shared twelve truffle recipes in my 12 Truffles of Christmas series. Then, I shared twenty four cookies in my 4th Annual 24 Cookies of Christmas series. Then, although it wasn’t a series, because I shared all of the recipes on the same day and in one giant post, there was my 12 Festive Holiday Cocktails series. And, now, here I am finishing up Lord Byron’s 12 No Bake Christmas Treats series!
I hope you have enjoyed these as much as I have. And, even though today is Chrsitmas Eve and I won’t be sharing any more Christmas recipes this year, I do hope that you will stick with me once the presents have been opened, the decorations come down, and we all get back into the swing of “normal” life in January!

HERE IS WHAT YOU WILL NEED FOR THIS RECIPE
The following is a list of the ingredients needed to prepare this recipe. For exact amounts and measurements, refer to the printable recipe card located near the bottom of this post.
- Cream Cheese – When baking with cream cheese it is always best to use brick style rather than whipped or cream cheese in a tub. The brick style is firmer and more condensed. Cream cheese adds texture and flavour to baked items.
- Confectioner’s Sugar – This superfine sugar is sometimes called powdered sugar. It is used in frostings quite often. When dusted lightly onto cakes and cookies, it adds just a touch of sweetness, but more importantly, it looks very visually appealing!
- Peppermint Extract – You could use vanilla, but we’re going to pack as much peppermint flavour as possible into these treats!
- M&Ms – Any candy coated peppermint flavoured chocolate will do, just use one that is festive like red and green M&Ms!
- Sanding Sugar – Coarse sugar, sometimes referred to as sanding sugar, is used sometimes for decorative purposes. It is sometimes called pearl sugar or coarse baking sugar.
LET’S TALK ABOUT THE INGREDIENTS
For this particular recipe, you most certainly should use regular cream cheese – not light or fat free. First of all, Christmas is not the time to think about calories and fat content. No it isn’t! And, secondly, the regular cream cheese is almost always slightly thicker, which you will need to make this recipe work well. Otherwise, you might need to add another cup or two of the confectioner’s sugar.
There’s really no need to sift the confectioner’s sugar first. When beating it with the mixer into the cream cheese and peppermint extract mixture, the clumps will break down easily if there are any to begin with. Speaking of peppermint extract, be really careful when measuring it. You will want to use two teaspoons exactly. Since confectioner’s sugar is basically sugar dust, it will thin out quite easily with just the slightest bit of liquid.
If you add extra extract, even if it’s not on purpose, you will need to add more confectioner’s sugar to get the mixture to the right consistency. Just use a measuring spoon and you’ll be fine.

FOOD COLOURING FOR THOUGHT
When I think of something that is minty, I usually think of something this is green. I know minty treats are white too, but I always think of green for some reason. Anyway, if you want, you can colour the cream cheese mixture by using a bit of food colouring.
There are two basic forms of food colouring – liquid and gel. Just like the lecture above about the peppermint extract, the liquid food colouring will certainly affect the consistency of these Mint Candy Melts. In the case of these melts, use gel food colouring. I’m not promoting the product, and I’m not being paid to say this, but Wilton has the best gel food colouring I’ve ever used. You can buy it in any baking supply store, but Amazon stocks it as well.

CANDIES, CANDIES, AND MORE CANDIES!
I know I use M&Ms quite often in many of my cookie and no-bake treats, but there are other candy coated chocolates out there that you can use. Here in Canada, we have something called Smarties. I think in the United States, smarties are those flat, pressed-powder like candy that comes in cellophane-wrapped roll. They’re often found in large bags for Halloween treats. In Canada, smarties are a candy coated chocolate much like the popular M&M.
You might also consider using Cadbury Mini Eggs – they are my all-time favourite! They release bags at Christmastime with red and green candy coated mini eggs. Although, in comparison to Hershey’s Eggies, Cadbury Mini Eggs are quite muted. The Hershey’s brand has very bright and vivid red and green colours.
For my purposes, I wanted to increase the minty flavour in this recipe and I knew the peppermint extract wasn’t going to cut it. So, I used Mint M&Ms as well. The centers are made with peppermint flavoured white chocolate. You can buy them at Walmart or online at Amazon. Here in Canada, they tend to be cheapest at Shoppers Drug Mart.
HOW TO MAKE MINT CANDY MELTS
Add the softened cream cheese to a mixing bowl. It is imperative that the cream cheese is soft, otherwise, it will take forever to beat the confectioner’s sugar into it. Add the confectioner’s sugar and peppermint extract to the bowl as well. Use you mixer to beat until well combined. Be sure to start off on a low speed, otherwise, you’ll end up with confectioner’s sugar all over your kitchen!
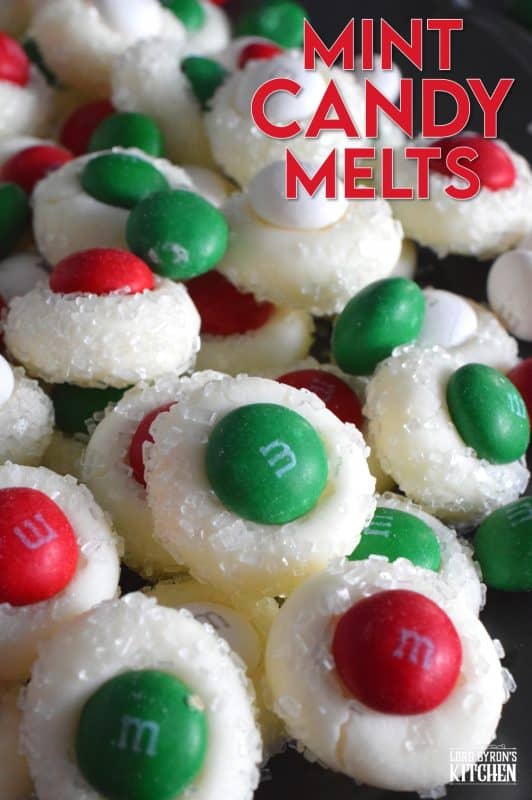
Once down, portion into one tablespoon amounts and roll into a ball. Roll the ball into sanding sugar and place the ball onto a parchment-lined baking sheet. Push a M&M right into the center of the ball. Push it down deep into the ball so that the candy sticks and stays put!
Once done, transfer the baking sheet to the fridge and let sit for two hours. This will firm the cream cheese back up and you’ll end up with a nice, firm, creamy candy. Transfer chilled candies to a food-safe container and keep refrigerated.
Looking For More Christmas Confections?
Lord Byron’s Kitchen has more than enough to satisfy your sweet tooth! Click on the links below to see a countdown series of holiday recipes from that category!
STORING, PACKAGING, & FREEZING
When it comes to most no bake confections, they taste best at room temperature, but they don’t hold up well to being left out on your countertop for long periods of time. Some of them will stay fresh in a cookie jar or food-safe container with a lid for 3-5 days if left to sit on your kitchen countertop. But, others most certainly will not! If in doubt, store them in a food-safe container in your fridge. When you want one, two, or half a dozen, take them out of the container and place them in a single layer on a plate. Let them sit at room temperature for 5 minutes and they’re ready!
Most no-bake confections are made without the need to freeze them for long periods of time, but they can be frozen. For this recipe, I have tested whether or not they can be frozen, and they certainly can! Once they are completely hardened, pile them into a clean, food-safe container. The container must be freezer friendly! You’ll want to ensure a very tight fitting lid too. I use these quite often when freezing baked goods. I like to place a sheet of plastic wrap over the top of the container before pushing the lid on. This helps to create a better seal. The goal is to keep all of that freshness locked in!
You can freeze these for up to three months. If you plan to give previously frozen confections as a gift, lay them out onto a wire cooling rack in a single layer to thaw out. Condensation might form and that’s normal. Giving them space to breath by not overlapping them will help to eliminate that. Once thawed, pile into cellophane bags and tie with a ribbon, or stack in a cookie tin/box.

QUESTIONS?
If I have not answered all of your questions in the text above, don’t hesitate to reach out to me! You can contact me by sending me a message in the comments section further down the page. I will try my best to answer as soon as possible! You might reach me even faster by following me on Facebook and sending me a private message. Scroll down to follow me and never miss another recipe!
Finally, as I stated previously, every day I will be posting a new recipe. If you miss one, don’t fret. You can find my entire collection of Christmas Recipes right here! There are over 100 Christmas recipes and counting. There’s something for everyone! Cheers!
Lord Byron’s Annual Christmas Cookie Series
Did you know that Lord Byron’s Kitchen has been sharing a 24 Cookies of Christmas Series for the past several years? Click on the links below to see all of the recipes from each series on one page!
CONCLUSION:
Thank you, Dear Reader, for following along and putting up with my madness in yet another Christmas series! It’s Christmas Eve and I’m about to prepare for our annual evening of pajamas, movies, and food! Over the next few days, I might drop in with a new recipe or a festive post or two. But, one thing is for sure, I am taking tomorrow off in its entirety! I’ll be cooking both a turkey and a tofurkey. Weather permitting, dad will here with us this Christmas too!
If I don’t get another chance to say so, I’d like to wish each and everyone of you the merriest of Christmases and the most happy and prosperous New Year! Thank you so much for reading my posts and baking/cooking with this year. More than any other year, you have have shared your creations with me on social media. Please continue to tag me at #lordbyronskitchen so that I can see your version of my recipes!
Finally, be sure to get some downtime. Christmas can be stressful, so it’s important to take some time for yourself, even if that means going for a walk in the snow by yourself. I’ll see you back here in January for our regularly scheduled programming! Ha!
xoxo
Do You Like This Recipe?
You should consider trying these other delicious recipes too!


Mint Candy Melts
Ingredients
- 4 ounces cream cheese, softened (use brick style cream cheese, not spreadable or whipped)
- 5 cups confectioner's sugar (may need an extra cup or two to get right consistency)
- 2 teaspoons peppermint extract
- 1/2 cup sanding sugar
- 400 grams Mint M&M Candy
Instructions
- Add the softened cream cheese to a mixing bowl. It is imperative that the cream cheese is soft, otherwise, it will take forever to beat the confectioner’s sugar into it.
- Add the confectioner’s sugar and peppermint extract to the bowl as well. Use you mixer to beat until well combined. Be sure to start off on a low speed, otherwise, you’ll end up with confectioner’s sugar all over your kitchen!
- Once done, portion into one tablespoon amounts and roll into a ball.
- Roll the ball into sanding sugar and place the ball onto a parchment-lined baking sheet.
- Push a M&M right into the center of the ball. Push it down deep into the ball so that the candy sticks and stays put!
- Once done, transfer the baking sheet to the fridge and let sit for two hours. This will firm the cream cheese back up and you’ll end up with a nice, firm, creamy candy. Transfer chilled candies to a food-safe container and keep refrigerated.
Nutrition
Did you make this recipe?
Upload a photo and tag me so that I can see it!


Leave a Reply