
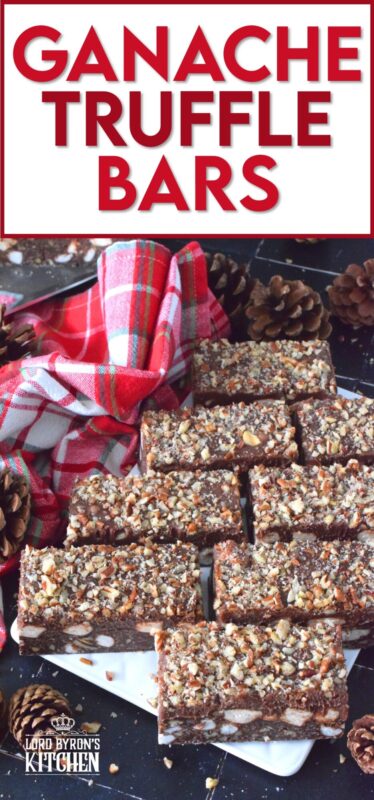
If you’re looking for a holiday treat that is both super rich and decadent, Ganache Truffle Bars are just the answer! Marshmallows, toasted pecans, and coconut smothered in a chocolate truffle base is topped with a thick, creamy ganache and more pecans; this luscious and delectable treat is the ultimate Christmas dessert!

Out of all of the bars and squares that I tested for this series, these Ganache Truffle Bars were the hardest to share. Honestly, Dear Reader, I wanted to keep this all to myself! But, alas, I did not. Most of the bars and squares in this series were tested back in July and August. We were in the middle of a major kitchen renovation, but when the construction crew stayed away on the weekends, I would squeeze in as many recipes as possible in what was then my unorganized, messy kitchen.
On Monday, when the construction guys would come back, I would put out cookies, bars, and squares for them to enjoy. I remember these bars being a favourite of the apprentice who was working under the supervision of the countertop installation guy. In fact, when he returned on Monday, he politely asked if I had any more. Our designer, Dan, couldn’t finish the bar because it was just too rich. He took half home to his wife. To me, that’s a success. And, it just goes to prove that when I said these were rich, I wasn’t stretching the truth.
I decided to incorporate the word truffle into the title of these bars because most homemade holiday-style truffle recipes begin with melted chocolate and canned sweetened condensed milk. That’s exactly how these begin. And, even though these bars are packed with marshmallows, coconut, and pecans, you can still taste that truffle base at the heart of it all. Likewise, ganache is prepared with scalded milk and chocolate, which is the topping on these bars, making Ganache Truffle Bars the perfect title!
Make your own online recipe box!
Click the in the lower right corner of your screen
& follow the quick and easy instructions!
LORD BYRON’S 12 BARS AND SQUARES OF CHRISTMAS
Ganache Truffle Bars are the eighth confection in my new series! Yes, that’s right, Dear Reader! I’m kicking off another holiday baking series, just like I have for the past few Christmases! Welcome to Lord Byron’s 12 Bars and Squares of Christmas!!!
If you have been reading my blog for while – well, at least anytime around Christmas for the past few years – you must have run into at least one of my Christmas baking countdowns. This particular countdown is all about bars and squares. For 12 consecutive days, I will share a holiday-based bar or square recipe with you. That means on Saturday and Sunday too! I usually publish new recipes three times a week, so I hope you’re up for this!
You really don’t want to miss one of these recipes, so if you have not yet subscribed to Lord Byron’s Kitchen, I encourage you to do so. That way, a new recipe will be emailed to you every day. You won’t have to bother to come looking for it! Like in previous holiday baking countdowns, I like to mix up the recipes in the series so that there is something for everyone. There will be bars and squares with chocolate, some with candy, and some with nuts too. Are you ready for day 8!!??
Looking For More Christmas Confections?
Lord Byron’s Kitchen has more than enough to satisfy your sweet tooth! Click on the links below to see a countdown series of holiday recipes from that category!
NO-BAKE RECIPES
I used to think that the term no-bake meant that a recipe was more of an assembly-type recipe. Something like a salad, for example. It sounds simple enough, right? Toss the lettuce and any other veggies you want into a bowl. Top it with cheese, croutons, avocado, hard-boiled egg, etc. Add some dressing and you’re all done! But, no-bake actually just means no baking. There still might be some stove-top cooking needed – or even a microwave, for that matter.
To prepare these Ganache Truffle Bars, you will need to use your microwave. So, even though they’re no-bake and kid-friendly, you will still need some way to melt the chocolate.
Some other no-bake-type holiday recipes you might enjoy are these Rudolph’s Red Nose Cookies. Hairy Moose Droppings are delicious and always quite the conversation starter! Just like these Caramel Peanut Slices were a favourite of my mom’s so were these Marshmallow Coconut Balls and so were these Christmas Crunch Cookies. You can find many more no-bake cookie recipes here at Lord Byron’s Kitchen by using the search field at the top of this page.

INGREDIENTS NEEDED TO PREPARE THIS RECIPE
The following is a list of the ingredients needed to prepare this recipe. For exact amounts and measurements, refer to the printable recipe card located near the bottom of this post.
Base Layer:
- Chocolate Chips – I use chocolate chips a lot in my recipes, and I change up the type depending on how I feel. Unless the recipe states otherwise, you can use milk, semi-sweet, or dark chips. In this particular case, semi-sweet chocolate just seems to work better.
- Canned Sweetened Condensed Milk – This recipe has not been tested with low-fat condensed milk. Depending on where you live, the size of the can may differ. Be sure to have at least 14 ounces!
- Mini Marshmallows – I’m using vegan marshmallows in this recipe. Here’s where you can find them. If they are unavailable in your area, you can use regular mini marshmallows.
- Salted Pecans – I love the crunch of the salted chopped pecans mixed throughout the chocolatey base, and adding more on top of the ganache adds even more texture. If you don’t have or don’t care for pecans, you can use walnuts, peanuts, cashews, etc.
- Coconut – Because sweetened condensed milk is so sweet, use unsweetened coconut.
Top Layer:
- Chocolate Chips
- Mini Marshmallows
- Cream – Sometimes called whipping cream or heavy cream, this high-fat content dairy product is often used for dessert toppings, ice creams, and even some cakes and cookies. Look for a cream with 35 – 38% fat content.
- Salted Pecans
HOW TO MAKE GANACHE TRUFFLE BARS
This no-bake recipe comes together quickly and easily. The first thing you should do is to prepare a 9 x 13-inch baking pan by lining it well with parchment paper. Fold the parchment paper so that it fits snugly in the pan. I use two sheets – one folded to fit the length of the pan and another folded to fit across the pan. Allow the excess parchment paper to hang out over the side of the pan. Once the confection is firm, use the excess parchment to lift the whole block out of the pan to make it easy to cut into bars.
Next, in a large, microwaveable bowl, melt the chocolate chips and the condensed milk on high speed in 30-second intervals, stirring well between each increment, until melted and combined. Add the mini marshmallows, chopped pecans, and unsweetened coconut. Use a sturdy spatula to fold those into the chocolate mixture until well incorporated.
Transfer the mixture to the prepared baking dish. Press down with the spatula to flatten slightly. Sprinkle over the remaining 1 cup of mini marshmallows. Use the palm of your hand to gently push them into the mixture slightly. Set aside to cool for 30 minutes. Transfer the fridge for another 30 minutes to chill.

PREPARING THE GANACHE TOPPING
Next, add the heavy whipping cream to a saucepan, and over medium heat, heat the cream until bubbles form around the perimeter of the saucepan. Do not bring the cream to a boil! You will want it to be hot, but not boiling.
While you wait, transfer the chocolate chips for the topping into a heatproof bowl. Pour the hot cream over top of the chocolate chips and allow the bowl to sit undisturbed for 5 minutes before stirring with a spatula to form the ganache.
Remove the baking pan from the fridge and spoon the ganache over top. Use an offset spatula to spread the ganache evenly over the marshmallows. Depending on how far the marshmallows were pushed into the chocolate mixture, the ganache may or may not totally cover them. Both ways will work perfectly fine. Sprinkle over the pecans and once again, allow the baking sheet to sit at room temperature for 30 minutes. Then, transfer to the fridge for another 30 minutes before cutting into squares.
Once cut, store the bars in an airtight, food-safe container and keep them refrigerated. Squares will last 7-10 days in the fridge. Squares can be frozen for 2-3 months.
Do you have a question or comment?
Would you like to leave a review?
Scroll down to the comment section and write me a message.
I will personally respond as soon as possible!
SWEETENED CONDENSED MILK
I have a lot of recipes here at Lord Byron’s Kitchen with sweetened condensed milk as one of the ingredients. (Click here to see them!) Growing up in Newfoundland, it was always something I’ve been aware of. But, that’s not the case for everyone. I get many questions from readers about it. For someone not familiar with gooey, sticky canned milk, it might be easily confused with canned Carnation condensed milk, for instance. Let me explain what it is here.
So, first of all, it’s condensed. The milk is condensed by removing water. This can be accomplished by applying heat. The water will evaporate causing the milk to condense, which thickens the milk. Sugar is added to sweeten the condensed milk. The main purpose of adding sugar is to prolong the shelf life of condensed milk, which can sit on room-temperature shelves for years. Sugar prevents microorganisms from growing in the milk and helps to thicken it even further—it’s added after the milk has been boiled, reduced, and pasteurized.
If you find unsweetened condensed milk, it’s most likely that it’s simply evaporated milk or condensed milk, which is thick, but not gooey and sticky. Evaporated milk is often used as a cream added to tea or coffee. If you are unfamiliar with it, please read the can carefully. Also, shake it – can you feel the liquid splashing about inside the can? If so, it’s not sweetened condensed milk; it’s evaporated or condensed milk only!

DANDIES VEGAN MARSHMALLOWS
Now, if you just so happen to click on the link for Dandies in the last paragraph, you will note that the brand has both large and mini marshmallows. Depending on the time of year, they also have flavours like pumpkin and peppermint – and now maple too!
This post is not sponsored by Dandies, and I don’t want you to think that I’m preaching veganism at you, because I am far from vegan. However, whenever I find a product I love, I always share it with you. You most certainly don’t have to be vegan to enjoy Dandies marshmallows. They also have no artificial colours or flavours, which is always a bonus.
If you have any friends or family with food allergies, you might want to consider using Dandies as well. Unlike real marshmallows, there’s no corn syrup, they are kosher, and have no GMOs. Dandies are manufactured in a gluten-free environment and are free from many common allergens such as wheat, peanuts, tree nuts, dairy, eggs, shellfish, fish, mustard, corn, and sesame. Seriously, what do you have to lose!?
In the spirit of full disclosure, I will tell you that a representative from Dandies did reach out to me after reading one of my previous recipes using their product. They offered to send me marshmallows twice now – one of those shipments being the peppermint marshmallows used in this recipe. Still, I would not promote the product without fully supporting it. Honestly, they taste wonderful and I’m not sure I could tell the difference between a vegan marshmallow and a “real” one! They’re really that good! So, thank you, Dandies!
Lord Byron’s Annual Christmas Cookie Series
Did you know that Lord Byron’s Kitchen has been sharing a 24 Cookies of Christmas Series for the past several years? Click on the links below to see all of the recipes from each series on one page!
HEAVY CREAM VS WHIPPING CREAM
Confession time – I use them both interchangeably, depending on what is available at the store, or whatever is on sale! Both of these can be quite costly. If memory serves me correctly, a 250mL carton, or one cup, here in Canada, will run just short of $5! There is a difference between the two, but not enough to concern yourself with when it comes to Vanilla Mascarpone Cream.
Just in case you’re interested, the most basic difference is the amount of fat contained in both. Whipping cream has 35% fat. It can be whipped into peaks and it’s also rich enough that it won’t curdle when heated in soups and sauces. It’s nearly identical to heavy cream so if a recipe calls for heavy cream and you can only find whipping cream, feel free to use that instead. In contrast, heavy cream, which is sometimes called heavy whipping cream, contains about 38% fat. Either of those would work well in this recipe. I used 35% whipping cream.

THE TYPE OF COCONUT IS IMPORTANT
When it comes to coconut to bake with, there are two kinds – sweetened and unsweetened. Those two types can be found in different levels of fineness and coarseness. It’s important to use unsweetened coconut for this recipe. Otherwise, with the addition of both granulated and brown sugar, these Coconut Mixed Peel Squares may be too sweet to eat!
You’ll want to use unsweetened coconut. The size of the shredded coconut won’t make a difference to the taste, but it certainly will make a difference when you try to cut out the squares. The longer shreds of coconut might make for a messier cut or bite and you want your delicious squares to look just as amazing as they taste!
Depending on the brand, some coconut is shredded, grated, or desiccated. Shredded usually refers to larger pieces, while grated tends to be smaller. Desiccated has nothing to do with the size of the pieces but means the coconut is dried or the moisture has been removed. In most cases, you will find a fine or medium grade. Medium is my personal coconut of choice in most cases and it is what I used here.
TOASTING CASHEWS
The first thing you should do it to toast your nuts. How do you do that? It’s very simple! To be perfectly honest, this applies to any nuts or seeds, not just the nuts in this recipe. If you are not familiar with toasted nuts, then please try it just once. You will probably never revert to using nuts in your cooking or baking again without toasting them first!
I have tried using non-stick frying pans for toasting, but nothing works as well as a stainless steel pan. You could use a cast iron pan, but since they get very hot and retain heat so well, it’s easier to burn the nuts. See the frying pan in this picture? That’s the exact one that I use all the time. I’m not suggesting you run out and buy this same cookware set, but I want you to see the pan – remember, do not use non-stick if possible. You’ll get better results will plain stainless steel.
So, unlike most cooking where you’re required to preheat first, you don’t want to apply that same rule to toasting nuts. Add the nuts to a cold pan. Place the pan on the burner and turn the heat on – no higher than medium and probably even less if using a gas burner.
Keep the nuts moving about. I use a rubber spatula. Once you start to smell that warm and toasty aromatic smell, pay close attention. The nuts will take on a darker colour. Don’t let them get too dark. Once you’re satisfied, immediately remove them from the hot pan and transfer them to a dinner plate where they can be spread out to cool.

STORING, PACKAGING, & FREEZING
Most no-bake confections are made without the need to freeze them for long periods of time, but they can be frozen. For this recipe, I have tested whether or not they can be frozen, and they certainly can! Once they are completely firm, pile them into a clean, food-safe container. The container must be freezer friendly! You’ll want to ensure a very tight-fitting lid too. I use these quite often when freezing baked goods. I like to place a sheet of plastic wrap over the top of the container before pushing the lid on. This helps to create a better seal. The goal is to keep all of that freshness locked in! You can freeze these for up to three months.
Do You Like This Recipe?
You should consider trying these other delicious recipes too!


Ganache Truffle Bars
Ingredients
Ingredients for the Base:
- 2 cups semi-sweet chocolate chips
- 14 ounces sweetened condensed milk
- 1 1/2 cups mini marshmallows
- 1 cup chopped toasted salted pecans
- 2 cups unsweetened coconut
Ingredients for the Topping:
- 1 cup mini marshmallows
- 1 3/4 cup semi-sweet chocolate chips
- 1/2 cup heavy cream
- 1/2 cup chopped toasted salted pecans
Instructions
- This no-bake recipe comes together quickly and easily. The first thing you should do is to prepare a 9 x 13-inch baking pan by lining it well with parchment paper. Fold the parchment paper so that it fits snugly in the pan. I use two sheets – one folded to fit the length of the pan and another folded to fit across the pan. Allow the excess parchment paper to hang out over the side of the pan. Once the confection is firm, use the excess parchment to lift the whole block out of the pan to make it easy to cut into bars.
- Next, in a large, microwaveable bowl, melt the chocolate chips and the condensed milk on high speed in 30-second intervals, stirring well between each increment, until melted and combined.
- Add the mini marshmallows, chopped pecans, and unsweetened coconut. Use a sturdy spatula to fold those into the chocolate mixture until well incorporated.
- Transfer the mixture to the prepared baking dish. Press down with the spatula to flatten slightly.
- Sprinkle over the remaining 1 cup of mini marshmallows. Use the palm of your hand to gently push them into the mixture slightly. Set aside to cool for 30 minutes. Transfer the fridge for another 30 minutes to chill.
- Next, add the heavy whipping cream to a saucepan, and over medium heat, heat the cream until bubbles form around the perimeter of the saucepan. Do not bring the cream to a boil! You will want it to be hot, but not boiling.
- While you wait, transfer the chocolate chips for the topping into a heatproof bowl. Pour the hot cream over top of the chocolate chips and allow the bowl to sit undisturbed for 5 minutes before stirring with a spatula to form the ganache.
- Remove the baking pan from the fridge and spoon the ganache over top. Use an off-set spatula to spread the ganache evenly over the marshmallows. Depending on how far the marshmallows were pushed into the chocolate mixture, the ganache may or may not totally cover them. Both ways will work perfectly fine.
- Sprinkle over the pecans and once again, allow the baking sheet to sit at room temperature for 30 minutes. Then, transfer to the fridge for another 30 minutes before cutting into squares.
Nutrition
Did you make this recipe?
Upload a photo and tag me so that I can see it!


ELIZABETH says
I can’t wait to try this recipe. I love coconut but I have family members who don’t can I leave it out?