
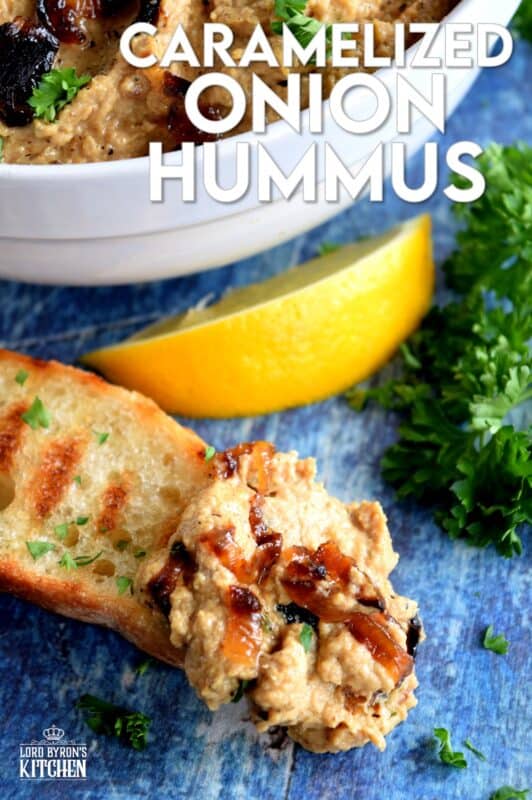
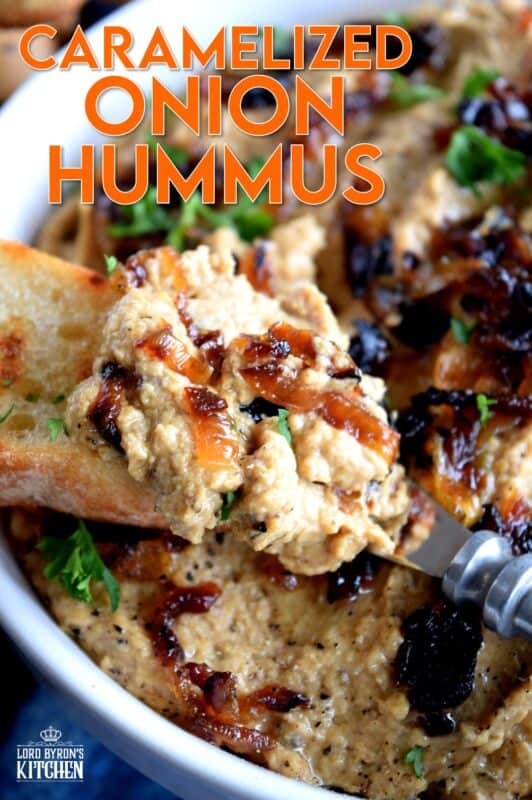
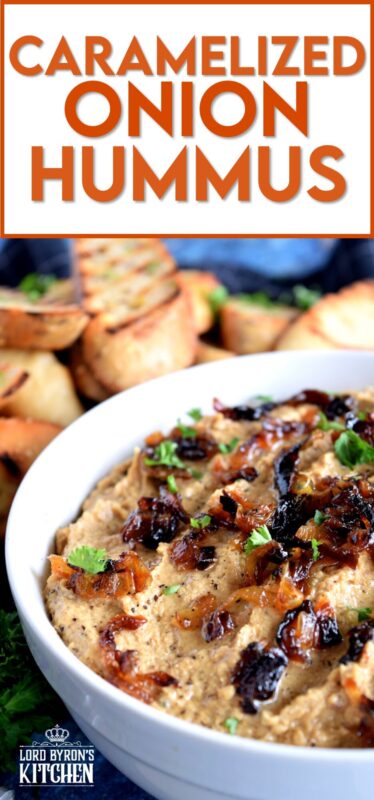
Of all the varieties of hummus, Caramelized Onion Hummus is my favourite. It works great with veggies, but also as a spread with grilled crostini, crackers, or rice cakes. This hummus is completely versatile because it’s both savoury and sweet at the same time!
As I mentioned in a previous hummus post, I spent a recent Saturday afternoon experimenting with making hummus at home rather than purchasing the store-bought variety. Caramelized Onion Hummus was just one of them. I also made Roasted Red Pepper Hummus, and Sun Dried Tomato and Fresh Basil Hummus. The difference in taste was simply phenomenal! I, for one, love the taste of fresh!

CERTAIN FOODS CAN BRING BACK GREAT MEMORIES
The first step for this recipe is to caramelize the onions. Caramelizing onion is an art form in itself. In fact, it’s the only way I’ll eat onion – it has to be really, really well done. The smell of slowly frying onion invokes a beautiful memory for me. It takes me back to the cold, winter months of my childhood, more specifically, grade three!
I can pinpoint my age, because I was in grade three, which would mean that I was eight years old. In the small town that I grew up in, in a few instances, I was paired with other grade levels at school. For example, the grade two and three classes were hosted in the same room, and I can remember the same about grade five and six. I’m not sure if it was because of limited classroom space, limited teacher budgets, or because the student number was so low. Anyway, I digress!
In grade three, I had the most amazing teacher – in fact, most of my teachers were great throughout my academic years, but this one particular teacher was my favourite. In fact, I still keep in touch via Facebook, more than 30 years later!
I remember that the students in grade two would start class at 1 pm, after the one-hour lunch break. The grade three students, however, were not required back to school until 2 pm. (Remember, both classes shared the same room and the same teacher.)
Make your own online recipe box!
Click the in the lower right corner of your screen
& follow the quick and easy instructions!
LET’S GO TO MY AUNT’S HOUSE!
Rather than stay home and wait for class to start, I would leave home with my older sister and younger brother who both started back to class at 1 pm, and head to my favourite aunt’s house. I would stay with her while she ate her lunch. I would leave about five minutes or so before class started.
This was my daily, weekday routine for a very long time. I can’t recall if it was the entire grade three school year, but I can be certain that it was at least for several months.
My Aunt Beryl had children too. None of my cousins shared a classroom with me, so all four of them had eaten lunch and headed back to school. This was when my aunt would have her lunch, and while doing so, she would take a break from her duties as a housewife, and watch Days of Our Lives. She was the reason I became hooked on daytime soap operas; a habit I’ve since been able to break.
IT WAS ALL ABOUT THE ONIONS!
Right now, at this very moment, I’m sitting at my desk, and I can smell homemade French fries which have been deep-fried in shortening; I can smell the BBQ sauce that she used to dip her fries into (trust me, it works very well if the fries are cut thin and fried until they are crispy); and I can smell onions being pan-fried in a cast iron skillet.
Her home always smelled so good, because something was always cooking on the stovetop, or baking in the oven. And caramelized onions, I think, were one of her favourite ingredients. I remember well how much my uncle, her husband, would like to pan-fry onions and potatoes.
These memories and smells bring me right back to 1984 when I became too familiar with Bo and Hope, and watched adult, daytime television with my beautiful aunt. I still think of her often and only with the fondest of memories. Her memory evokes such a strong sense of comfort and a time when I had no responsibilities or worries. My aunt passed away in October of 2002. She will be forever missed.
HOMEMADE IS BETTER!
A coworker of mine told me that once I tried homemade hummus, it would be difficult to go back to the store-bought kind because of the difference in taste. She stressed that the homemade version was so much better. She was right!
My first time making hummus was an afternoon event. I had the apartment to myself (John.e had been invited out to coffee with an old classmate) and I decided a blog post was in order.
In the week leading up to trying to make hummus, I did a lot of recipe research, reading comments and criticisms on blogs and recipe posts. I didn’t want to put in the effort and not totally love the results. I wanted to learn as much as possible beforehand from bloggers and recipe writers who have tried their hand at hummussing. Yes, I just switched hummus from a noun to a verb!
At the end of the day, I was extremely proud of the results. Needless to say, unless I’m in a real pinch in the future, I won’t be purchasing store-bought hummus again anytime soon. I also learned from my research, that properly stored in air-tight containers, homemade hummus will last in the refrigerator for 7-10 days. Another excuse to indulge in my secret love affair with mason jars!

INGREDIENTS NEEDED TO PREPARE THIS RECIPE
The following is a list of the ingredients needed to prepare this recipe. For exact amounts and measurements, refer to the printable recipe card located near the bottom of this post.
- Canned Chickpeas – Use one can of chickpeas that you have drained and rinsed well under cold running water.
- Lemon Juice – Do not be tempted to use the stuff from a bottle. It has a metallic taste to it. Use freshly squeezed lemon juice for best results.
- Tahini – This can be found in jars in most grocery stores. It is basically pureed sesame seeds.
- Garlic – Fresh garlic is best!
- Salt & Ground Black Pepper
- Butter – I like to use salted butter, because it makes the caramelized onions even more delicious and savoury.
- Onions – You will need two onions and you can use yellow or white onions.
- Olive Oil
Do you have a question or comment?
Would you like to leave a review?
Scroll down to the comment section and write me a message.
I will personally respond as soon as possible!
HOW TO CARAMELIZE ONIONS
Caramelizing onions is extremely easy, but it does take patience. It is something that cannot be rushed, because to caramelize is to break down the natural sugar in the onion, and over low heat, brown the sugar will softening and cooking the onions thoroughly. Here’s how I do it.
Add one tablespoon of olive oil and one tablespoon of salted butter to a skillet. Over medium-low heat, melt the butter into the oil. Add the sliced onions and stir with a spatula to coat in the butter and oil mixture. Allow the onions to cook slowly, stirring every 10 minutes or so for 30 minutes. Add the salt and ground black pepper and stir into the onions.
Continue to cook, until the onions are soft, but not breaking apart or mushy, and have turned a deep brown. Sometimes, depending on the type of skillet or your stovetop, and the type of onions used, they may get a little dark. Don’t worry, they are not burnt. Taste them and they will still be super sweet. However, it they get too dark, remove them from the heat and get them out of the skillet immediately.
HOW TO MAKE CARAMELIZED ONION HUMMUS
Once you have prepared and measured out the ingredients, the rest of this recipe is a breeze! Get out your food processor and add all of the ingredients into it with the exception of the onions. Puree the ingredients until they are well blended and very smooth. It helps to scape down the bowl of the food processor to ensure everything is evenly blended.
At this point, depending on how you like your hummus, you can add additional olive oil, to thin it out. Sometimes, I find the hummus can be too thick or clumpy. This can be due to the brand of chickpeas. Just add a teaspoon or two of oil and puree it again.
Finally, add the caramelized onion and pulse it into the hummus. You don’t want to completely pulverize the onions. It’s nice to see the little brown flecks in the hummus. In fact, I place half of the onions into the hummus and pulse. The other half, I stir into the hummus so that I have large pieces of that beautifully, caramelized deliciousness throughout the hummus.
CAN’T FIND TAHINI – MAKE YOUR OWN!
Tahini is a paste-like concoction made with sesame seeds, salt, and oil. It takes minutes to make and comes together quite easily with the help of a food processor. You don’t have to do this, but if you want to get the most flavour, toast the sesame seeds first. When toasted, allow them to fully cool and then dump them into your food processor. You will need one cup of sesame seeds.
Blend on high speed for at least two minutes. Scrape down the sides of the bowl and puree again for another minute. The sesame seeds will still be coarse at this point, but adding oil will help to break them down and make them smooth. Add three tablespoons of light oil, such as vegetable oil or light olive oil, to the food processor. Puree for another three minutes. The tahini should be smooth and pourable but still have a thick consistency.
If not, scrape down the bowl and add one more tablespoon of oil. Puree again for another minute. Finally, taste the tahini and season with salt. Add the salt to the food processor and pulse to just mix through. Store the tahini in a clean mason jar for up to one month in your fridge.

HOW TO TOAST SESAME SEEDS
To be perfectly honest, this applies to all nuts or seeds, not just sesame seeds. If you are not familiar with toasted sesame seeds, then please try it just once. You will probably never revert to using untoasted sesame seeds in your cooking or baking again!
I have tried using non-stick frying pans for toasting, but nothing works as well as a stainless steel pan. You could use a cast iron pan, but since they get very hot and retain heat so well, it’s easier to burn the seeds. See the frying pan in this picture? That’s the exact one that I use all the time. I’m not suggesting you run out and buy this same cookware set, but I wanted you to see the pan – remember, do not use non-stick if possible. You’ll get better results will plain stainless steel.
So, unlike most cooking where you’re required to preheat first, you don’t want to apply that same rule to toasting seeds. Add the seeds to a cold pan. Place the pan on the burner and turn the heat on – no higher than medium and probably even less if using a gas burner.
Keep the seeds moving about. I use a rubber spatula. Once you start to smell that warm and toasty aromatic smell, pay close attention. The seeds will take on a slightly golden colour. Don’t let them get too dark. Once you’re satisfied, immediately remove them from the hot pan and transfer them to a dinner plate where they can be spread out to cool.

STORING HUMMUS
You can help hummus stay fresh longer by storing it in your refrigerator. Once you take out what you need, get it back into the fridge rather than allowing it to sit at room temperature. Hummus should be stored in a tightly closed container to keep out moisture and other contaminants. For a long-term option, hummus freezes well and defrosts overnight in the refrigerator. So, if you make too much or even make a double batch, you have the option to freeze some of it.
The shelf life of hummus depends on a variety of factors, and in the case of homemade hummus, the main factor will be the freshness of the ingredients used. For example, if the garlic isn’t fresh to begin with, it will continue to age and break down in the hummus, therefore, eventually ruining the batch.
Although not a perfect test, your nose is usually the most reliable instrument! Hummus that has turned bad will have a sour smell, whereas fresh hummus doesn’t have much aroma unless garlic has been added. If it smells sour, it will taste sour. Some hummus manufacturers will use preservatives that keep their product fresh for a longer period to time, but when preparing homemade hummus, no preservatives are added. You probably have nothing to worry about – it’s so good, you’ll eat it all up in no time anyway!
Do You Like This Recipe?
You should consider trying these other delicious recipes too!


Caramelized Onion Hummus
Ingredients
- 1 tablespoon salted butter
- 2 large onions, thinly sliced
- 15 ounces canned chickpeas, drained and rinsed
- 3 tablespoons tahini
- 2 cloves garlic, roughly chopped
- 1/4 cup freshly squeezed lemon juice
- 1 teaspoon salt
- 1/2 teaspoon ground black pepper
Instructions
- Start by adding the onions to a skillet with the butter. Over medium-low heat, slowly cook the onions until they turn a deep, golden brown colour. I prefer the onions to be very well done – I love the charred onion flavour!
- Once the onions are cooked to your liking, allow them to cool for 5-10 minutes.
- In the meantime, add the chick peas, tahini, garlic, lemon juice, salt, and pepper to your food processor. Pulse together the ingredients for 2-3 minutes until smooth and creamy.
- Next, add the caramelized onions and gently pulse once or twice just to break up the onions and to mix them through the hummus.
Notes
Nutrition
Did you make this recipe?
Upload a photo and tag me so that I can see it!


helene dsouza says
I never liked Hummus much, that’s because I am not into chickpeas but my husband absolutely loves it because he grew up eating Israeli food in India. Israelis love serving hummus with chicken schnitzel. You know what, I think I will enjoy the addition of onions, I think that’s the flavor that has been missing all along, so that I enjoy hummus too,
Byron Thomas says
It just might be the key, Helene. I’m not a fan of onions, but the chick peas balance out the onion flavour well for me. Come back and let me know if it works for you. Good luck! 🙂
Margaret Vieira says
Here’s an idea: I am going to give you money every week and then you can bring me lunch every day. Deal? lol
Nancy Hennessy says
Love carmilized onion# will be preparing today. I just found your recipes, haven’t found any that I don’t want to try
Thanks for your blog I am enjoying reading about your blog.
Amazing that you can think up so many recipes
byronethomas@gmail.com says
Thank you, Nancy. 🙂