
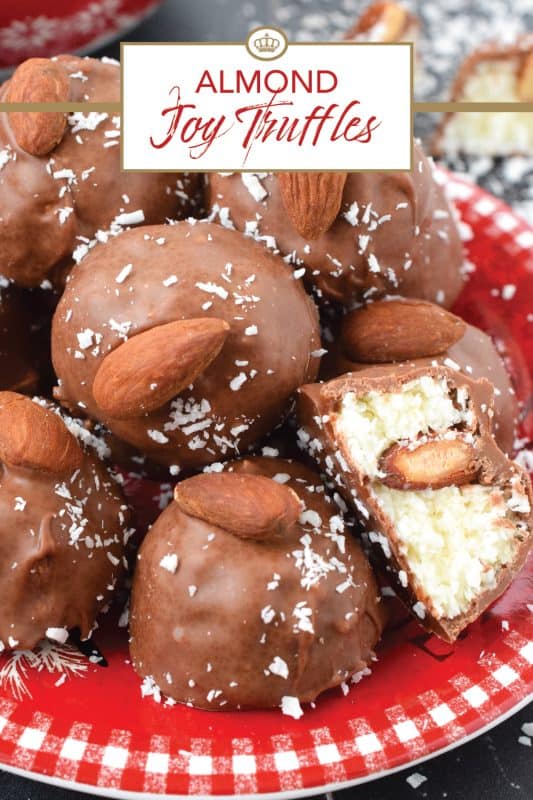
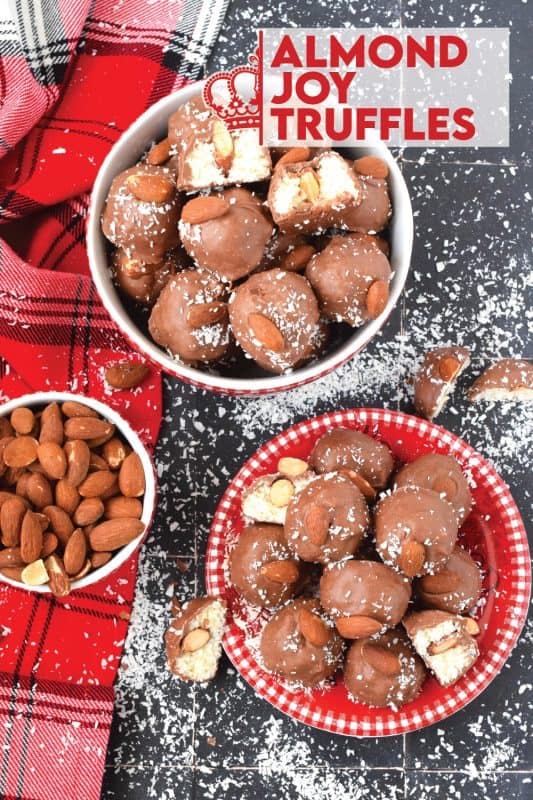
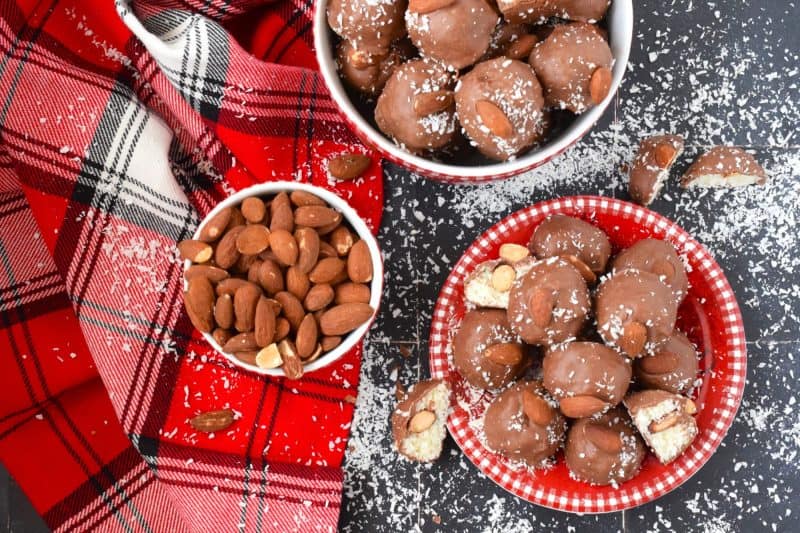
These Almond Joy Truffles taste exactly like an Almond Joy Chocolate Bar! They are so easy to make and have few ingredients. For the serious coconut lover, these truffles are perfectly sweet with a chewy center and a little almond crunch!

Hershey got it right when they first introduce the Almond Joy Chocolate Bar in 1946! This truffle version is an exact replica of the original, but in ball form. A center consisting of coconut and sweetened condensed milk is rolled into a ball and dipped into melted chocolate. The original has an almond on top, but my truffles have an almond in the center as well!
Almond Joy Truffles are rich, but not sickly rich. You know the sickly rich I’m talking about? It’s the kind of rich that makes your teeth ache and your jaws quiver. Does that happen to anyone else when you take a bite of something that is super sweet? These are not like that at all. They have the perfect balance of sweetness and creaminess, but those whole roasted almonds balance it all out with added crunch!
Let me tell you how to make these at home. They make a lovely sweet treat that everyone seems to love and they are very easy to make. Once fully set, the package and travel well, so it’s easy to assemble a treat bag with these and drop them off to your favourite neighbour or bring them to work for your favourite coworker!
Make your own online recipe box!
Click the in the lower right corner of your screen
& follow the quick and easy instructions!
SUBSCRIBE NOW AND NEVER MISS ANOTHER RECIPE!
So, welcome, Dear Reader, to my annual holiday-themed recipes. Traditionally, every year I share a series of recipes that you might already be familiar with. For example, I’ve previously shared 12 Holiday Trifles, 12 Holiday Bars & Squares, and even these 12 Edible Holiday Wreath recipes! Also, some of my favourite recipe collections from previous years are my 75 Homemade Gifts from Your Kitchen, my 50 Make Ahead Freezer Friendly Christmas Recipes, and my 30 No-Bake Christmas Recipes post.
This year I’m doing it differently. Rather than sharing multiple back to back series, I’m sharing a new holiday-themed recipe almost every day from now until Christmas Eve. For those of you who have followed my annual Lord Byron’s 24 Cookies of Christmas series, don’t worry, you will still get lots of new cookie recipes this year too. I will not, however, be publishing the cookies back to back in a 24-day series. This would have been my 8th year running the series and it becomes very exhausting. Also, we have a vacation booked in what would have been the middle of the series, so this year, I’m spreading the recipes out so that I’m not sharing the same type of recipe every day.
You really don’t want to miss one of these recipes, so if you have not yet subscribed to Lord Byron’s Kitchen, I encourage you to do so. That way, a new recipe will be emailed to you every day. You won’t have to bother to come looking for it! And, just in case you’re curious, you can see previous annual posts for my 24 Cookies of Christmas Series here!
INGREDIENTS NEEDED TO PREPARE THIS RECIPE
The following is a list of the ingredients needed to prepare this recipe. For exact amounts and measurements, refer to the printable recipe card located near the bottom of this post.
- Coconut – I prefer to use unsweetened grated coconut. Shredded coconut will work, but the pieces are too large in my opinion. A grated coconut has smaller pieces and works best in this recipe.
- Canned Sweetened Condensed Milk – This recipe has not been tested with low fat condensed milk. Depending on where you live, the size of the can my differ. Be sure to have at least 14 ounces!
- Roasted Almonds
- Milk Chocolate Chips
- Vegetable Oil
HOW TO MAKE ALMOND JOY TRUFFLES
Measure the coconut into a mixing bowl and pour in the sweetened condensed milk. Stir well until well combined. Portion out one slightly heaping tablespoon of the coconut mixture and roll inot a ball. (If you cannot roll a ball, add another 1/4 cup of coconut to the mixture and incorporate it well. Sometimes, depending on the brand of coconut, you may need a little more.) Roll all of the mixture into balls and place them on a baking sheet.
Press one whole almond length-wise into the top of each ball. Push down until the almond is completely hidden in the coconut ball. If the ball splits, just gently push it back together. Once all rolled, place the baking sheet in the fridge for 30 minutes. Once chilled, measure the milk chocolate chips and vegetable oil into a microwave-safe bowl. In increments of 30 seconds at half power, melt the chocolate, stirring well between each increment until the chocolate is fully melted and silky smooth.
Working with one coconut ball at a time, dip it entirely into the melted chocolate and allow the excess to drip back into the bowl. Set it on a baking sheet lined with parchment paper. Top the balls with another single whole almond and sprinkle with a little of the extra coconut for garnish. Once complete, set the baking sheet aside and allow the chocolate to cool at room temperature. Once firm, you may package the balls into a food-safe container. Keep refrigerated. Serve at room temperature.

THE TYPE OF COCONUT IS IMPORTANT
When it comes to coconut to bake with, there are two kinds – sweetened and unsweetened. Those two types can be found in different levels of fineness and coarseness. It’s important to use sweetened coconut for this recipe because there is no additional sugar added in terms of other ingredients used.
You’ll want to use sweetened coconut. The size of the shredded coconut won’t make a difference to the taste, but it certainly will make a difference to the look. The longer shreds of coconut might make for a messier cookie and you want your delicious cookies to look just as amazing as they taste!
Depending on the brand, some coconut is shredded, grated, or desiccated. Shredded usually refers to larger pieces, while grated tends to be smaller. Desiccated has nothing to do with the size of the pieces but means the coconut is dried or the moisture has been removed. In most cases, you will find a fine or medium grade. Medium is my personal coconut of choice in most cases and it is what I used here.

SWEETENED CONDENSED MILK
I have a lot of recipes here at Lord Byron’s Kitchen with sweetened condensed milk as one of the ingredients. (Click here to see them!) Growing up in Newfoundland, it was always something I’ve been aware of. But, that’s not the case for everyone. I get many questions from readers about it. For someone not familiar with the gooey, sticky canned milk, it might be easily confused with canned Carnation condensed milk, for instance. Let me explain what it is here.
So, first of all, it’s condensed. The milk is condensed by removing water. This can by accomplished by applying heat. The water will evaporate causing the milk to condense, which thickens the milk. Sugar is added to sweeten the condensed milk. The main purpose of adding sugar is to prolong the shelf life of condensed milk, which can sit on room temperature shelves for years. Sugar prevents microorganisms from growing in the milk and helps to thicken it even further—it’s added after the milk has been boiled, reduced, and pasteurized.
If you find an unsweetened condensed milk, it’s most likely that it’s simply evaporated milk or condensed milk, which is thick, but not gooey and sticky. Evaporated milk is often used as a cream added to tea or coffee. If you are unfamiliar with it, please read the can carefully. Also, shake it – can you feel the liquid splashing about inside the can? If so, it’s not sweetened condensed milk; it’s evaporated or condensed milk only!
STORING AND FREEZING
These biscotti will last in the freezer for three months. Be sure you have a good container with a tight seal. Whenever I’m freezing biscotti, I always double up on the seal action. Before I place the lid on, I always drape a sheet of plastic wrap on top. Then I push the lid on. I just feel that the lid fits more tightly. Any little thing I can do to keep the frost out, I’m going to do it! I like to use containers like this.
Like I always say, if you freeze any baked goods, remove only the amount you want when you decide to thaw them. Fetch the container from the freezer and remove only what you need. Put the lid back on and get the container back in the freezer.
To properly thaw baked goods, place them on a plate or a wire cooling rack. Don’t pile them. Spread them out and give them some space. Let them sit at room temperature for 10 to 15 minutes. They will taste fresh and perfect every single time!

QUESTIONS?
If I have not answered all of your questions in the text above, don’t hesitate to reach out to me! You can contact me by sending me a message in the comments section further down the page. I will try my best to answer as soon as possible! You might reach me even faster by following me on Facebook and sending me a private message. Scroll down below the recipe card to find my Follow Me on Social Media box and never miss another recipe!

Do You Like This Recipe?
You should consider trying these other delicious recipes too!


Almond Joy Truffles
Ingredients
- 3 1/2 cups unsweetened coconut, plus one tablespoon for garnish
- 14 ounces sweetened condensed milk
- 48 whole roasted almonds
- 2 cups milk chocolate chips
- 1/2 teaspoon vegetable oil
Instructions
- Measure the coconut into a mixing bowl and pour in the sweetened condensed milk. Stir well until well combined
- Portion out one slightly heaping tablespoon of the coconut mixture and roll inot a ball. (If you cannot roll a ball, add another 1/4 cup of coconut to the mixture and incorporate it well. Sometimes, depending on the brand of coconut, you may need a little more.) Roll all of the mixture into balls and place them on a baking sheet.
- Press one whole almond length-wise into the top of each ball. Push down until the almond is completely hidden in the coconut ball. If the ball splits, just gently push it back together.
- Once all rolled, place the baking sheet in the fridge for 30 minutes.
- Once chilled, measure the milk chocolate chips and vegetable oil into a microwave-safe bowl.
- In increments of 30 seconds at half power, melt the chocolate, stirring well between each increment until the chocolate is fully melted and silky smooth.
- Working with one coconut ball at a time, dip it entirely into the melted chocolate and allow the excess to drip back into the bowl. Set it on a baking sheet lined with parchment paper.
- Top the balls with another single whole almond and sprinkle with a little of the extra coconut for garnish.
- Once complete, set the baking sheet aside and allow the chocolate to cool at room temperature. Once firm, you may package the balls into a food-safe container. Keep refrigerated. Serve at room temperature.
Nutrition
Did you make this recipe?
Upload a photo and tag me so that I can see it!


Leave a Reply