
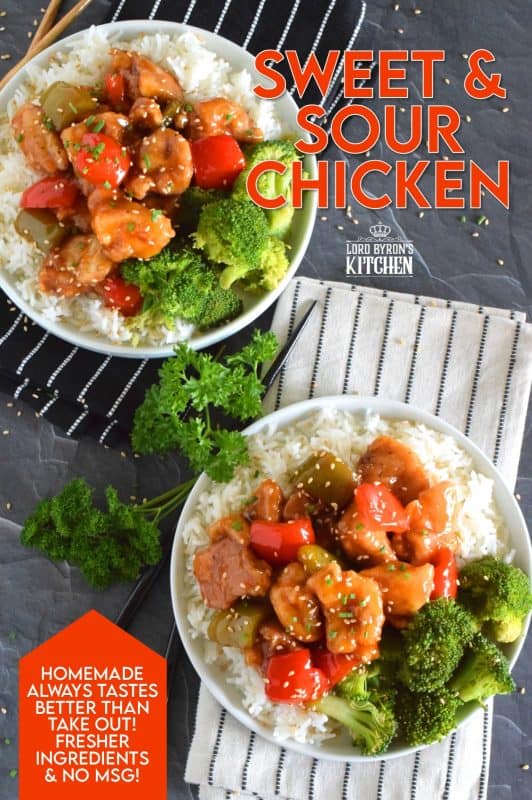
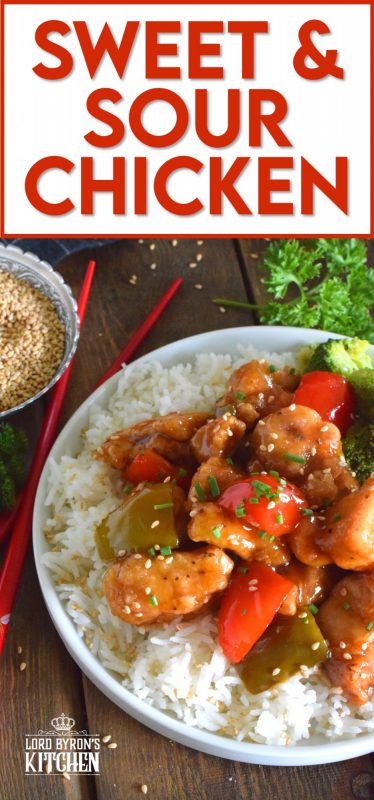
A really great Sweet and Sour Chicken recipe has two parts. Firstly, the chicken must be fried with a light and crispy batter. Secondly, the sauce must be both sweet and sour, but also thick and glossy. With this easy, Asian-inspired, do-it-yourself recipe, you won’t need to order Chinese delivery again!
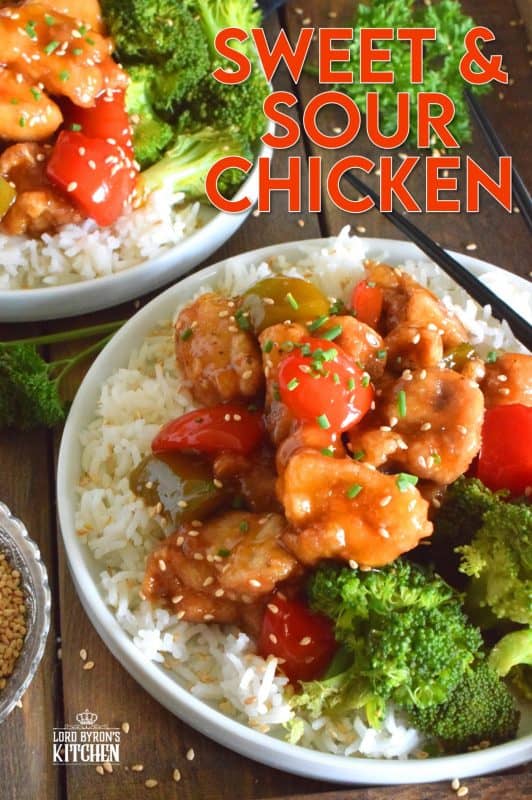
If you love chicken and you love sauce, this Sweet and Sour Chicken recipe is for you! Look at how gorgeous that dish looks! It’s a complete meal, and one that you would have had to spend money on, and wait for someone else to make it and deliver to your home – until now. Now, you have this easy recipe that you can go to and make your own version at home. Trust me, it will cost less, taste better, and make you feel good about what you accomplished!
Sweet and Sour Chicken makes me think of Chinese food. I absolutely love it and before we started spending our time outside the city, we used to order it often. Can I share a little truth with you? We used to spend way too much money on take out food. It’s true and it’s shameful! How many times have I expressed my love of cooking? I have a food blog for crying out loud! Yet, when we all used to arrive home from work and school on Friday night, ordering in was such a treat!
We didn’t order every night, mind you! But, Friday nights was our night to just relax and put the week behind us. We used to be hooked on Chinese food, but eventually, that changed to pizza. But, ordering in food can be quite expensive, especially when you have a family like ours. Two of us will eat meat, but John.e is a vegetarian, so we basically have to order two of everything. Let me explain.

ORDERING IN TONIGHT? BEEN THERE; DONE THAT!
Scenario 1: Ordering Pizza. We managed to find a pizza joint that all three of us can agree on. The pizza perfect each and every time. And, they happen to have a regular deal which consists of three pizzas, any size, with a total of 9 combined toppings. Now, you may be asking why a family of three needs to order three pizzas. Well, it’s simple: one meat (for me), one with just mushrooms (for McKenna), and one vegetarian with black olives (gross!) for John.e.
Mckenna will only eat mushrooms and cheese on her pizza. I can be quite picky too and prefer just pepperoni and bacon. John.e tends to like more toppings – green pepper, mushrooms, onions, tomatoes, and black olives. So, three pizzas are necessary. Why not order a half and half pizza? That would work, but a half and half pizza will not work if I’m the one sharing it with the vegetarians. Meat cannot come anywhere close to their food. And, on the flip side, I can barely physically touch olives – black or green – so that leaves that half and half option out. Do you see the dilemma?
Scenario 2: Ordering Chinese. There’s this little Chinese restaurant on Parliament Street in Toronto that we love. But, like the pizza dilemma, ordering Chinese is the same thing. John.e likes his noodles and his tofu dish. I always want noodles or rice with chicken or pork. And, McKenna likes the seafood noodle dish. We just can’t agree! So, at the end of the day, when all food-related disagreements have been settled, we usually end up spending over $80 on take out every Friday night. That’s why it was time to start preparing Chinese food at home!

PREPARING A CHINESE FOOD FEAST AT HOME
Dear Reader, I have got you covered! Here at Lord Byron’s Kitchen, you can find many recipes to make an Asian-inspired meal at home! Of course, start with this Sweet and Sour Chicken recipe. It’s a classic and everyone loves it! If you need a vegetarian option, I have this Honey Sweet Chili Tofu. It’s a great alternative to chicken. There’s also a Szechuan Tofu and Peppers recipe that is delicious as well.
Sesame Chicken is one of the best things I’ve ever eaten! And so is Lemon Chicken. Those are both very popular Asian-style chicken dishes. But, what about pork and beef? Well, look no further! Try my Moo Shu Pork, or this Peking Pork. In terms of beef, I’d be doing you a disservice if I didn’t point you in the direction of my 30 Minute Ginger Beef, or my Beijing Beef.
What about sides? Oh, yes, I’ve got that covered too! Start with these Spicy Vegetable Noodles, or this easy Lo Mein. Now, you can make some plain steamed rice, or you can make this Beef Flavoured Rice. It’s my absolute favourite rice dish! Finally, try my Vegetarian Spring Rolls too! See, I told you that you can make a complete meat at home using my recipes!

HERE IS WHAT YOU WILL NEED:
- Chicken – For best results, use boneless skinless chicken thighs. They have more flavour and will not dry out, which is especially important when employing the double fry method. I’m using free range chicken from Ottawa Valley Meats.
- Cornstarch – This is used twice. First, it is used to form a crispy batter on the chicken. It’s used a second time to help thicken the sauce.
- Oil – You will need oil to fry the chicken. Either vegetable or canola oil is good.
- Bell Peppers – I used one large red and one large green bell pepper.
- Pineapple Juice – You only need one cup, so unless you are going to drink the rest, only buy a small bottle
- Brown Sugar – The sauce needs the sugar for sweetness. Brown sugar helps with caramelization, which makes a beautiful, glossy sauce.
- Ketchup – Ketchup is used for colour, sweetness, and tartness.
- Soy Sauce – There’s a lot of soy sauce in here, so use low sodium for best results.
- Rice Vinegar – You can use other vinegars as well, such as white vinegar, cider vinegar, or even rice or champagne vinegar. Don’t use malt or balsamic for this dish.
- Spices and Seasonings – To round everything out, you will need salt and black pepper, as well as garlic powder and onion powder.
- Sesame Seeds – For garnish and completely optional.

LET’S GET EVERYTHING SET UP FIRST
Whenever I am frying anything, I make sure I have everything set up first so that I don’t have to walk away from that hot oil. It is never a good idea to leave oil unattended. Not only is it flammable, but the temperature can fluctuate rapidly leaving you with either burnt food or a soggy mess. Ever have fried food with a greasy batter? That means the temperature of the oil was too low and the batter soaked it up. Nobody wants that!
I like to first measure all of the sauce ingredients into a bowl and whisk them together. I set that aside and add my cornstarch and water to a smaller bowl and set that aside too. When you get to the point where you’re ready to use both the sauce and the slurry, it’s just a matter of a quick stir to make sure nothing has settled to the bottom of the bowl and that’s it! Finally, I cut up the bell peppers into large chunks – about an inch or so – and set them aside as well.

Next, I get started on the main. In this case, it’s the chicken. I add the chicken to a bowl and add in the salt and pepper. Use a rubber spatula – or clean hands! – to toss the chicken so that it is all evenly coated with salt and pepper. Next, I dump in the cornstarch and toss well to coat. As a final step, I like to separate the chicken.
Ever notice that when meat and cornstarch are mixed together and left to sit for a bit, the cornstarch will get wet and eventually the meat is sticking to each other? To avoid that, I like to separate each piece of chicken and lay it out onto a sheet pan. As I separate the chicken, I shake off the excess cornstarch, which is a necessary step anyway. Before I know it, I’m ready to heat up the oil and start frying!

FRYING THE CHICKEN
When you’re ready to fry the chicken, pour the oil into a heavy bottomed pot. A Dutch oven is great for deep frying! You will want about four inches of oil in your pot. Turn on the heat and bring the oil to optimum frying temperature. For Sweet and Sour Chicken, you will want the oil to be between 300 and 315 degrees. If in doubt, use a kitchen thermometer!
Set a baking sheet with a wire cooling rack on it next to the pot. You will place the fried chicken on the wire rack in a single layer. This will allow air to flow around the fried chicken, allow the excess grease to drip off, and keep the batter crispy and crunchy.
Once you’re all ready to go and the oil is hot enough, it’s time to fry! Using tongs, lower the chicken into the oil one piece at a time. Don’t overcrowd the pot. I tend to fry them off about a dozen pieces at a time. The chicken fries really quickly; it only needs about 5-6 minutes.
Once all of the chicken is fried, increase the heat of the oil to 350 degrees. Carefully place all of the chicken back into the oil. This is what I refer to as the second fry and it will add further crisp to your chicken and it only needs another 3-4 minutes. Remove from the oil and drain well. Next, it’s time for the sauce!
IT’S TIME FOR THE SAUCE!
Let’s face it, this recipe is all about the sauce. Sure, fried chicken pieces are great, but they only have some salt and pepper at this point. We need more flavour and the sauce is going to provide all of that and more. And, this sauce is so simple too!
You took the time to measure all of the sauce ingredients into a bowl, so now all you have to do is transfer all of it to a skillet. Add in the chopped bell peppers too! Over medium-high heat, continuously whisk the sauce until it starts to boil. Reduce the heat to medium and mix the slurry by combining the cornstarch with the water. Pour this into the sauce while whisking. The sauce will immediately thicken. Continue to stir until all of the sauce is the same consistency.
Finally, add the fried chicken and toss it with the sauce until each piece is generously and completely covered with that gorgeous sauce. Now, it’s the moment you have been waiting for! Plate up your Sweet and Sour Chicken with your sides. I love this dish with plain rice and a side of steamed broccoli. Top the chicken with some sesame seeds. Some finely sliced green onion is good too!


Sweet and Sour Chicken
Ingredients
- 3 pounds boneless skinless chicken thighs, cut into 1-1 1/2 inch pieces
- 1/2 teaspoon salt
- 1/2 teaspoon ground black pepper
- 3/4 cup cornstarch
- 1 large green bell pepper, cut into 1 inch pieces
- 1 large red bell pepper, cut into 1 inch pieces
Sauce Ingredients:
- 1 cup pineapple juice
- 3/4 cup brown sugar, lightly packed
- 1/3 cup rice vinegar
- 1/4 cup ketchup
- 2 tablespoons low sodium soy sauce
- 1 teaspoon onion powder
- 1/2 teaspoon garlic powder
Slurry Ingredients:
- 1 tablespoon cornstarch
- 3 tablespoons water
- oil for frying
Instructions
- Measure all of the sauce ingredients into a bowl and whisk them together and set aside.
- Measure the slurry ingredients into a bowl and whisk them together. Set aside.
- Pour the oil into a heavy bottomed pot such as a Dutch Oven. You will want about four inches of oil in your pot. Turn on the heat and bring the oil to 300-315 degrees. If in doubt, use a kitchen thermometer!
- Set a baking sheet with a wire cooling rack on it next to the pot. You will place the fried chicken on the wire rack in a single layer. This will allow air to flow around the fried chicken, allow the excess grease to drip off, and keep the batter crispy and crunchy.
- Using tongs, lower the chicken into the oil one piece at a time. Don’t overcrowd the pot. I tend to fry them off about a dozen pieces at a time. The chicken fries really quickly; it only needs about 5-6 minutes.
- Once all of the chicken is fried, increase the heat of the oil to 350 degrees. Carefully place all of the chicken back into the oil. This is what I refer to as the second fry and it will add further crisp to your chicken and it only needs another 3-4 minutes. Remove from the oil and drain well.
- Next, transfer the bowl of sauce and the bell peppers to a skillet and over medium-high heat, continuously whisk the sauce until it starts to boil.
- Reduce the heat to medium and mix the slurry by combining the cornstarch with the water. Pour this into the sauce while whisking. The sauce will immediately thicken. Continue to stir until all of the sauce is the same consistency.
- Finally, add the fried chicken and toss it with the sauce until each piece is generously and completely covered.
- Serve immediately with sesame seeds as a garnish.
Nutrition


helan says
Thanks For Sharing this Amazing Recipe. My Family Loved It. I will be sharing this Recipe with my Friends. Hope They will like it.
Allyssa says
This is really tasty and delicious recipe! Thank you so much for sharing this sweet and sour chicken! Highly recommended! Well done!
byronethomas@gmail.com says
Thank you! 🙂
Sara LaFountain says
Fantastic dinner! My kids inhaled it! Loved your easy-to-follow recipe.
Nart at Cooking with Nart says
Nothing beats sweet and sour chicken with rice on a night in and this recipe sure doesn’t disappoint. It’s so delicious and much better than any takeaway versions we’ve had. Definitely a keeper!
Liz says
This recipe sounds delicious! We love sweet & sour chicken at our house!