
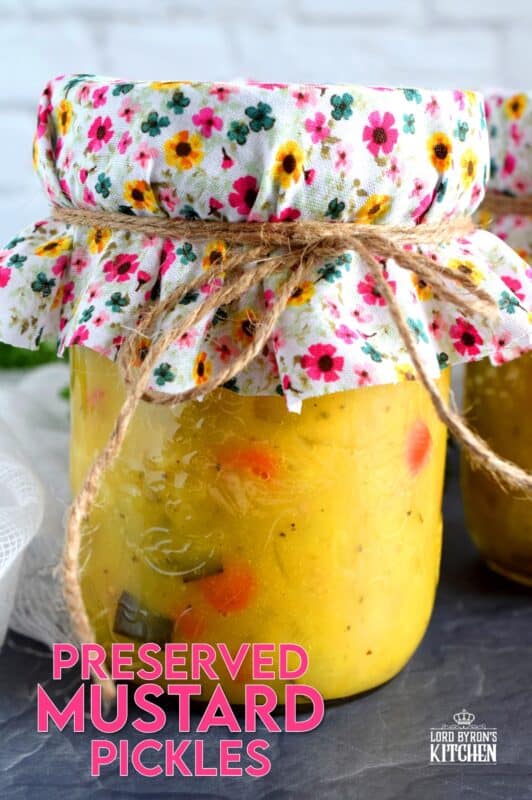
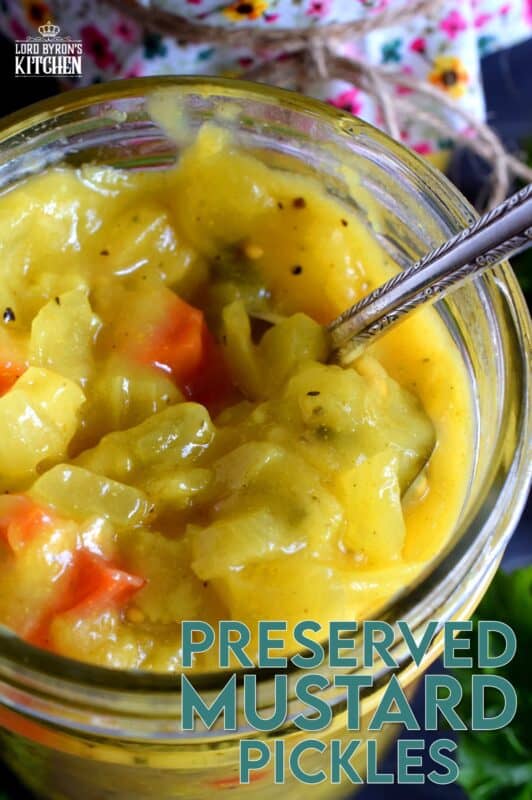
Preserved Mustard Pickles are a sweet and tart condiment or side dish made from cauliflower, zucchini, red bell pepper, onion, and carrot. A condiment so delicious, I often eat it as a side dish!

A NEWFOUNDLAND DELICACY!
If you are a Newfoundlander, or if you’re blessed enough to be really good friends with one, you might have had Preserved Mustard Pickles at least once. If not, Dear Reader, you’ve missed out on an entire world of culinary deliciousness.
This recipe might not look pretty enough for the pages of a food magazine, but when you’re looking for comfort food, you most often look in one place: your mom’s kitchen. Can I get an amen?
Growing up in Newfoundland, things like cauliflower and peppers were not a family table staple. In fact, I can remember the first time I saw a piece of celery that wasn’t on television! With limited growing seasons, Newfoundlanders for many generations, have mastered the art of canning for the long winter months ahead.
Make your own online recipe box!
Click the in the lower right corner of your screen
& follow the quick and easy instructions!
PRESERVING FOOD IS NECESSARY IN SOME CULTURES
My mom and dad would often can side dishes and whole dinners. These jars of food would help to provide an easy, fast meal during the winter months when food became scarce or weather conditions prevented travel to the closest towns with chain grocery stores.
Our pantry was packed with canned moose meat, seal meat, pickled beets, sweet mustard pickles, canned chicken, soups, jams, and jellies. My mom could have a hot bowl of homemade soup on the table in five minutes. Or a meaty moose gravy to slather over mashed potatoes in no time at all.

IT WASN’T A FAIRYTALE – IT WAS REAL LIFE!
To you, my childhood might sound something like that of Oliver Twist’s, but it was fantastic; really, it was! I learned so many life lessons watching how mom and dad provided for us three kids on a limited income.
I learned how to knit, crochet, sew, cook, bake, budget, preserve, and how to make every grocery item in the pantry stretch just a little bit further. I’m fortunate enough not to have to worry about things like that so much, but I still have the skills should the time ever come.
Strangely though, even though I could easily go to the store and buy these things, there’s nothing like homemade, and there’s nothing that can compare to investing the hours it takes to preserve food. I canned 16 bottles of Dad’s Canned Pickled Beets the same day I canned these pickles; 7 hours in the kitchen and I enjoyed every single minute. #nolie
Now, excuse me, while I go crack open a jar of these Preserved Mustard Pickles and spread some onto whatever I can find – bread, cold roast beef, ham sandwich, crackers, etc. Or, maybe I’ll just sit back on the couch with a jar and a spoon.
HERE IS WHAT YOU WILL NEED:
The following is a list of the ingredients needed to prepare this recipe. For exact amounts and measurements, refer to the printable recipe card located near the bottom of this post.
- Cauliflower – One large cauliflower is all you need. Wash it well and trim away any discoloured bits. Cut the cauliflower into small florets.
- Onions – You will need about 8 large onions. Yes, that’s a lot, but this recipe makes a lot! I like to cut the onions into slices, but you can dice them if you wish.
- Red Bell Pepper – Two of these are required. Finely chop them.
- Zucchini – Three large zucchini, skin on, finely chopped.
- Carrots – I used 2 medium carrots, peeled and sliced 1/4 in thick.
- All-Purpose Flour
- Dry Mustard – This is a powdered mustard, usually sold in small cans. You will find it in the spice section of most grocery stores.
- Sugar – Use regular granulated sugar. I have not tested this recipe with Splenda or any other low-calorie sweetener.
- Spices – Turmeric, curry powder, ground ginger, black pepper, and salt.
- White Vinegar – Only white vinegar will do here. Anything else with throw off the taste.
- Mustard Seeds – Just like the dry mustard, you can find these in the spice section, or even better, at a bulk store.
HOW TO MAKE MUSTARD PICKLES
The hardest part of this Preserved Mustard Pickles recipe is the canning, which in itself, is quite easy especially if you have been canning for a while. If you’re new to canning, do not fret. I’ve got you completely covered in the next section. I will walk you through the entire process. This section will deal with the cooking of the pickles first.
Begin by washing and cutting all of the vegetables and keeping them in separate bowls. One type of vegetable at a time, partially boil each vegetable in lightly salted water for about five minutes. This will ensure the vegetables retain their colour. Discard the water and add fresh water to the pot for each vegetable.
In a very large stock pot, place all of the dry ingredients and stir well to combine. Those ingredients are the flour, dry mustard, sugar, all of the spices and mustard seeds. Add in the water and vinegar and whisk to incorporate the dry ingredients – be sure to get rid of all the lumps if any form.
Bring to a low boil over medium heat until the sugar is dissolved. Once done, simmer for 5 minutes, stirring continuously. Add the vegetables and stir to combine. Bring the mixture back to a low boil and allow to cook for 1-2 minutes. That’s it! Now, it’s time to move on to the canning part!

HOW TO WATER BATH CAN
STEP 1: PREPARING THE JARS
Some canners say that if you need to boil the jars longer than 10 minutes, then you don’t need to sterilize the jars. I say no! Canning is not as simple and cheap as frying an egg. It takes time, and an investment if you don’t already have the equipment. Eliminate any risk whatsoever by always sterilizing your jars. It’s easy to do! Wash the jars in hot, soapy water. Rinse the jars well under running water to get rid of any soap residue.
Transfer the jars to a large pot of water. Bring to a boil and boil for 2-3 minutes. Using a jar wrench/lifter, lift the jars out of the water, tilting to pour out the water. Be careful; it’s hot! Stand the jar up on a baking sheet. Once all of the jars are on the baking sheet, place them into your preheated oven at 200 degrees F. This will keep them hot and away from any contamination.
Do you have a question or comment?
Would you like to leave a review?
Scroll down to the comment section and write me a message.
I will personally respond as soon as possible!
STEP 2: PREPARING THE SEALS AND RINGS
Mason jars are equipped with three parts. The first is the jar. The second and third parts combine to form the lid. The flat disc with the rubber ring on the bottom is the seal. Finally, the circular part that screws onto the jar is called a screw band. Depending on the brand or the recipe you’re reading, the names of these things can vary. But, they all do the same thing.
The screw bands never come in contact with the food, so they do not need to be washed or sterilized. But, because I want to eliminate any risk of contamination, I make sure they’re clean. After all, they have been sitting in a warehouse before they got to the store, and then finally, to me. That’s too many germs for my comfort level! I wash them in hot, soapy water, rinse them well, and transfer them to a bowl until I need them. The sealing disk/sealing ring needs a little more consideration.
If you look at the bottom of the lid, you will see a reddish-brown rubber ring. It’s attached to the lid. This ring has a huge job! It is pretty much in charge of keeping your food safe for long-term storage. Place the lids into a glass bowl. I like to separate them so that they are not all stacked. When I’m ready to ladle the food into the jars, I pour a kettle of boiling water over the lids so that they are sterile, and the rubber band softens. That’s it. You have now prepared your jars. Next, we need to get the canner ready!

STEP 3: PREPARING THE CANNER
You can buy a canning pot, but you don’t have to do that. Any stock pot will do just fine. Be sure that the pot is tall enough to hold enough water so that your jars are covered by at least an inch of water. Fill the canning pot accordingly. Also, be sure to insert a canning rack or mat into the bottom of your pot. If you buy a canning pot it will come with one. Otherwise, you can buy them for any pot size. Never let your jars touch the bottom of the pot when boiling. They could easily break. Once you’ve done this, bring the water to a full boil.
In most cases, if you’re new to canning, you might notice some white residue on the jars. This can easily be cleaned off once the jars are cool. A few tablespoons of white vinegar in the boiling water helps to eliminate most of it. I use it every single time.
Lastly, it’s always a good idea to keep a kettle of boiling water close by. Depending on how many jars you need to process, you might have to boil them in batches. You will be surprised at how quickly rapidly boiling water can evaporate. Having a kettle of boiling water will allow you to easily top up the canning pot without altering the temperature of the water.
STEP 4: FILLING THE JARS
Depending on the recipe, filling the jars is quite easy. Having some inexpensive equipment on hand can make this process much easier. Invest in a canning funnel. It will help you ladle the Preserved Mustard Pickles into the jars without making a mess. Remember to pay attention to the recipe’s recommended headspace. This is the amount of empty space from the top of the food to the very top of the jar. Also, it’s imperative to keep the rim of the jar clean to ensure a good seal. You will also need a bubble remover. You can buy these, but I’m not a fan of them. A clean wooden chopstick does the same thing. Removing bubbles will prevent mould from growing.
Lastly, you will need a magnetic lid lifter. Remember how I said the flat sealing lids will be submerged in a bowl of boiling water? Well, you can’t just pick them up with your hands. First of all, it’s hot! Secondly, you will want to eliminate the risk of any contamination. Do not touch the underside of the lid. Period! Using a magnetic lid lifter will allow you to pick up the lid and position it right onto the rim of the jar without ever touching it.
Finally, you will need to screw on the metal screw bands. In most cases, the food in the jars is scalding hot, so you can’t touch the jars to tighten the lids. But, that’s a good thing! You should never over-tighten the lids. Place the screw band over the jar and tighten it with one hand. It should be snug, not tight. Now, that’s it! You’re ready to boil these jars!
STEP 5: BOILING THE JARS OF FOOD
Carefully lift the jars straight up using a jar wrench/lifter. Lower the jar into the pot of boiling water. Fill the canning pot with jars in this manner. Don’t jam the jars in; leave a little bit of space between the jars. I aim for about a centimetre or a finger’s width. Remember, you can process the jars in batches.
Once the canning pot is loaded, place a lid on the pot, and start your timer according to the Preserved Mustard Pickles recipe below. If the water is not at a full boil, do not start timing until it is! When the time is up, use the jar wrench to lift the jars straight up out of the water. Transfer the jars to a flat surface that has been lined with a few layers of kitchen towels. Allow the jars to fully cool – at least 24 hours! Finally, wipe the jars down, label them with contents and date, and store them in a cool, dark cupboard or pantry.
Some people remove the screw bands after the jars have cooled for 24 hours. I remove them just to check if there is a good seal. I put them back on once I’ve checked. It’s up to you if you want to leave them off. If you notice that a jar has not sealed, you can either discard it, or refrigerate it for immediate consumption. Only do so if you are 100% sure the food has not been compromised and that it is safe to eat.
QUESTIONS?
If I have not answered all of your questions in the text above, don’t hesitate to reach out to me! You can contact me by sending me a message in the comments section further down the page. I will try my best to answer as soon as possible! You might reach me even faster by following me on Facebook and sending me a private message. Scroll down below the recipe card to find my Follow Me on Social Media box and never miss another recipe!

Do You Like This Recipe?
You should consider trying these other delicious recipes too!


Preserved Mustard Pickles
Ingredients
- 1 large cauliflower, cut into small florets
- 8 large onions, chopped
- 2 large red bell pepper, finely chopped
- 3 large zucchini, finely chopped
- 2 medium carrots, peeled and sliced 1/4 in thick
- 2 cup all-purpose flour
- 6 tablespoons dry mustard
- 2 1/2 cups sugar
- 2 tablespoons turmeric
- 2 teaspoons curry powder
- 1 teaspoon ground ginger
- 2 cups water
- 8 cups white vinegar
- 1 teaspoon ground black pepper
- 1 tablespoon salt
- 6 teaspoons mustard seeds
Instructions
- Begin by washing and cutting all of the vegetables and keeping them in separate bowls. One type of vegetable at a time, partially boil each vegetable in lightly salted water for about five minutes. This will ensure the vegetables retain their colour. Discard the water and add fresh water to the pot for each vegetable.
- In the meantime, clean and sterilize your jars and lids.
- In a very large stock pot, place all of the dry ingredients and stir well to combine. Add in the water and vinegar and whisk to incorporate the dry ingredients – be sure to get rid of all the lumps if any form.
- Bring to a low boil over medium heat until the sugar is dissolved. Once done, simmer for 5 minutes, stirring continuously.
- Add the vegetables and stir to combine. Bring the mixture back to a low boil and allow to cook for 1-2 minutes.
- Carefully ladle the mixture into hot jars, leaving ½ inch of headspace. Use a wooden skewer or chop stick to remove air bubbles. Wipe the rim of the jars clean and place a seal on each jar. Tighten the lid and process the jars in boiling water canner for 20 minutes.
Notes
- Fill a large stock pot with water. Lay a circular wire cooling rack into the bottom of the pot. This will act as a insulator between the jars and the bottom of the pot. The pot will get very hot; allowing the jars to sit directly on the heat source might result in breakage and you’ll want to avoid this.
- Bring the water to a rolling boil. You can use this hot water to sterilize your jars as described above. When you remove the jars and fill the jars with the pickles, you can use the same boiling water to process the jars for canning.
- To process the jars, first, carefully lower the jars into the boiling water using a canning jar lifter. Leave a 1/2 inch between the jars; I don’t like them to touch while boiling. You can do this in batches if you need to do so rather than overcrowding the pot.
- Boil for a good 20 minutes. Remove each jar from the pot using the canning jar lifter. Set the jars aside and leave to cool for at least 12 hours.
- About 30 minutes or so into the cooling time, the jars will making a popping sound. This sound is a result of the air contracting inside the jar which pulls the ring down creating a vacuum seal. You will note that the center of the lid will have been pulled down. When the jars are cooled, gently push down on the center of the lid. If the lid pushes down, the jar did not seal properly. Store that particular jar in your refrigerator and eat first. The rest of the jars can be wiped down with a moist towel, the lids re-tightened by hand, and labeled for storage.
- Store in a dry, dark cabinet.
Nutrition
Did you make this recipe?
Upload a photo and tag me so that I can see it!


Bill says
This looks much like a relish I grew up with in the Upper Peninsula of Michigan. We called it chow-chow. I have no idea the origin of chow-chow, but because of very diverse ethnic history of the area due to immigrants streaming in to fill copper and iron mines and cut timber, I suspect it is from shores afar. I’ve seen some recipes for Southern chow-chow that includes tomatoes and corn and collard greens and looks more like a relish … ours was not this. Ours was chunky with cauliflower, green peppers, onions, and mustard.
Enjoying your blog.
— Bill
byronethomas@gmail.com says
Thank you, Bill. Your relish with the cauliflower and onions sounds very much like my mustard pickle recipe. I’ve heard of southern chow-chow too, but being from Canada, it’s really not that common this far north. 🙂
Neely Moldovan says
I bet these are so good! Maybe one day Ill feel up to the challenge of trying them.
byronethomas@gmail.com says
Thank you, Neely. They’re well worth the effort. Save it for a rainy day project. 🙂
Tami Qualls says
Oh my husband would enjoy these pickles. I will have to give the recipe a try.
byronethomas@gmail.com says
Thank you, Tami. 🙂
Dana says
This beautiful! Sounds delicious and flavors bound up with childhood memories are the best!
byronethomas@gmail.com says
Thank you, Dana.
Elizabeth O says
When I saw the photo, I thought it was vegetable soup and then, I read the post and thought, Yum! I love pickles and would love to try some of this.
byronethomas@gmail.com says
Thanks, Elizabeth. 🙂
Shannon says
I’m about to try this… Can’t wait. I think I see a carrot in the picture, I bought carrots thinking that I would put them in the recipe. Am I losing my eyesight?
byronethomas@gmail.com says
You are quite right, Shannon! Thank you for bringing that to my attention. I’ve updated the recipe accordingly. There are, in fact, two medium sized carrots used for this recipe. 🙂 You are not losing your eyesight!
Tracey says
You mentioned above that there is 2 medium carrots in the recipe but the recipe states 2 pounds of carrots. Please clarify, this looks so lovely I would love to make it!
byronethomas@gmail.com says
Hi Tracey – it is indeed two medium carrots. 🙂
Dayna says
How long should I boil the vegetables?
byronethomas@gmail.com says
Hi Dayna – just until they are tender. Don’t over cook them.
Laura Potts says
I rarely comment on recipes, but when I saw this one, I knew I had to. My grandmother used to make these when I was growing up. I always loved them. I haven’t had them in years, as my grandmother passed away in 2002. My mother and I searched her recipes for years, and we finally found it about a year ago. We haven’t made them yet, but I hope to someday. Your recipe is identical to hers. Sorry for the long comment, but seeing this recipe brought back a lot of good memories of my childhood.
byronethomas@gmail.com says
Laura, you just made my day! I’m sorry to hear about your grandmother’s passing. It never gets easy, does it!? I hope you enjoy these pickles just as much as you enjoy your grandmother’s memories. 🙂
Tina Mintz says
I have an dear friend from Holton Maine that turned me onto mustard pickles and Fiddle Heads back in the 1980’s. Since I was from SC I had never heard of such things I was shocked how much I LOVED them! I’m making these wonderful pickles. Thank you for the recipe and mouthwatering memories.
byronethomas@gmail.com says
Thank you, Tina. It’s been so long since I’ve been to Maine; you’re now invoking fond memories for me too. 🙂
Brian Jones says
Wow, I must give this a try… So insanely similar to an old fashioned British Piccalilli complete with the Indian influence too! I have to confess to adding golden raisins to mine 😮
byronethomas@gmail.com says
That sounds mighty interesting, Brian. I like the raisin idea. I will give that a try!
Faye Henry says
These look so good and plan on making them in the morning. May I ask how many pints this recipe would make? Thanks. Live in N.B.
byronethomas@gmail.com says
Thank you, Faye. You’ll get about 12 pints from this recipe.
Tammy says
I am a Newfoundlander who grew up eating sweet mustard pickles and have always wanted to try making them. I was wondering how it would turn out if I didnt use the cauliflower (or if I just pop a couple of pieces in each jar)?
Thanks for sharing this recipe!
Tammy
byronethomas@gmail.com says
Yes, that would be just fine. I’ve had them without cauliflower and peppers, because the person who made them didn’t like both of those vegetables. It was still delicious!
whitney says
Hi there looks great….jwindering if 2 cups of flour is correct here, seems excessive?
byronethomas@gmail.com says
Hi Whitney – yes, two cups is correct.
Maureen Wells says
Hello Byron, I too am a NLer who has taken great pride in making sweet mustard pickles and other preserves for many years. This recipe is very close to the one I use with the exception that I have only ever used cucumbers where you use zucchini. Our garden this year did not yield a large crop of cucumbers but I have lots of the cooking type of pumpkin. I am considering using pumpkin in your recipe. I’d greatly appreciate your thoughts and advice.
Thank you for sharing your recipe,
Maureen Wells
Steady Brook, NL
byronethomas@gmail.com says
Thank you, Maureen. I must say, I don’t have much experience at all with cooking pumpkin. I would certainly give it a try, but I’m not so sure pumpkin would taste good in a mustard pickle. I wish I could be of more help, but I wouldn’t want to steer you in the wrong way and have you ruin a batch of Preserved Mustard Pickles. 🙂
Kiwi says
I’m from New Zealand we love our pickles
These are fantastic thanks for sharing
Norma says
Hi the recipe calls for 3 large zucchini but I have huge zucchini’s from my garden. Any chance you’d have any idea about roughly how many cups you use? Or is it possible to have too much zucchini?
byronethomas@gmail.com says
I get about two cups from one large zucchini, so I used about 6 cups in this recipe. However, if you want to use more, you certainly can.
Amy Liu Dong says
It looks so delicious! I love pickles! I will definitely try this. Also, my kid likes mustard and I think it’s destiny to see this!
Jamie says
Wow! This is definitely a great way to preserve our pickles! This looks amazingly delicious and very yummy! I totally love the presentation it just looks so perfect!
Catherine Dempsey MacDonald says
want to try it
Jeanette Wall says
I made these pickles and they turned out really good! I’m from Newfoundland!
Ange Hayden says
Cooked this recipe, it made 12 very full preserving jars and took about 4 hours to complete all the tasks. Very delicious and well worth the effort. i added a cob of corn as an extra.
Brenda says
I am NOT a pickle person…no,not at all! Well, with the exception of my jalapeños.
Because of a bad experience caused by fresh peppers, I severely burned my hands. No one told to wear latex gloves. Getting to the point…I developed my own recipe for Cowboy Candy. I use CANNED, SLICED,PICKLED JALAPEÑOS.I use the brine from the cans,adding more vinergar as needed. Let it mellow for a few weeks…then…Enjoy. A jar of this is a wonderful addition to a gift basket.I use the water bath process to can these.
Cassie Smith says
Hey Byron
I’d like to make these using gluten free flour instead of regular.
Do you know if it would work?
I always picture your parents when I read your blog. Also, your grandfather as I spent so much time over at his house with Verna.
Byron Thomas says
Hey Cassie! I’m sorry it has taken me so long to get back to you. My summer garden takes up much of my spare time, but the end of gardening season is here now, so I’m getting back to the grind. 🙂 I have not tested these with gluten free flour. In fact, many professional canning recipe developers say that you are not supposed to use flour in canning at all. I know mom used flour in her pickles for many years and we didn’t get sick or die. LOL.