
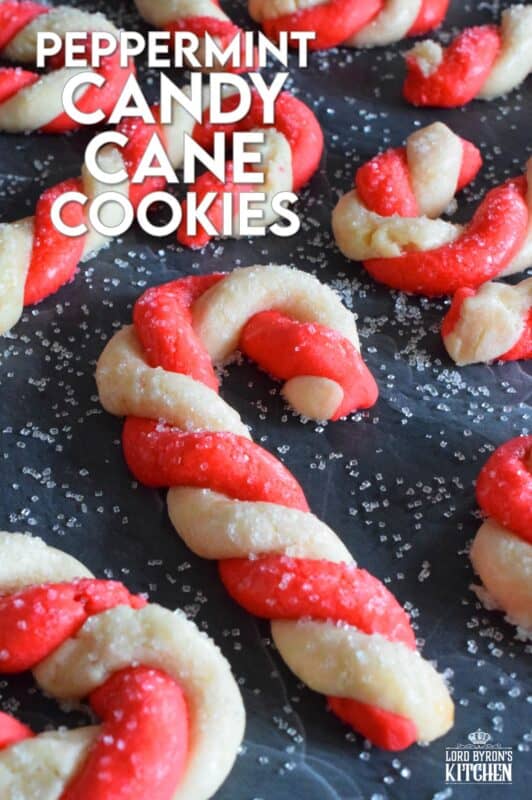
Peppermint Candy Cane Cookies are colourful, festive, and delicious! Half of the buttery cookie dough is tinted with food colouring, twisted and formed into a classic candy cane shape. Brushed with egg and topped with sanding sugar, these cookies are light and crisp and perfect for the holidays! Just picture these on your Christmas cookie platters!

I wish I could take full credit for inventing this recipe! But, I can’t, because this particular recipe, or some form of it, has been out there in social media land for a few years now. For my version, I have balanced out the peppermint flavour so that it is prevalent, but not overly strong. And, my Peppermint Candy Cane Cookies are topped with sanding sugar which adds a tasty, glistening finish to the beautiful cookies.
Sometimes when I research recipes, I will skip over some of them just because I think they’re too much work. In fact, I’ve wanted to make these cookies for quite some time, but kept putting it off, because I thought the amount of time it would take to prepare them would far outweigh the taste or the results. Well, as it turns out, I was completely wrong!
Make your own online recipe box!
Click the in the lower right corner of your screen
& follow the quick and easy instructions!
Being wrong is somewhat foreign to me. Just ask John.e! Ha! He will quickly agree that I’m always right! So, in the rare instance that I am wrong, it’s hard for me to admit it. But, in this case, I’ll take the hit. Not only are these cookies easy to make – and fun too! – they’re also very good. I love the balance of the peppermint extract in comparison to the vanilla.
Some of you might argue that there is no such thing as too much peppermint, and I would tend to agree with you. However, Dear Reader, I think our way of thinking might not be that popular. Oftentimes, I will get comments from people who have tried one of my peppermint-flavoured recipes stating that the peppermint was too strong. So, in this case, I’ve kept the peppermint flavour at the forefront, but lessened it a tad with vanilla extract.
Are you a full-on, die-hard peppermint fan? If you are, by all means, omit the vanilla extract entirely and substitute it with more peppermint extract. You do you while I try to appeal to and appease the masses. In the end, we’ll all be happy! Now, let’s get on with it!
MORE PEPPERMINT RECIPES
If you love the combination of baking and peppermint, there are several recipes here at Lord Byron’s Kitchen that you should take advantage of! You will have to try my Peppermint Chocolate Biscotti. I shared this one with my readers last year as a part of my 12 Biscotti of Christmas series. It was quite the hit!
How about this no-bake Peppermint Chunk Fudge? Unlike those fudge recipes that are basically big chunks of melted chocolate that have re-hardened, this fudge is cake-like; almost like a brownie! They are so delicious and addicting too! I also have these baked Chocolate Peppermint Donuts. Again, they are baked, not fried, so even though they are super chocolatey and covered in icing, they are still healthier than any donut you can buy at a bakery!
Not into cookies, fudge, or donuts? What about ice cream? John.e will buy peppermint flavoured ice cream every Christmas. Well, you can make your own No Churn Peppermint Cookie Ice Cream at home. You won’t need a fancy, expensive ice cream maker to do it! I added crushed peppermint Oreos to the ice cream to make it even more indulgent! Anyway, I digress. Let’s talk about these Peppermint Candy Cane Cookies!
LORD BYRON’S 24 COOKIES OF CHRISTMAS – VOLUME 5
I’m so excited about this year’s cookie countdown! This is the fifth consecutive year; can you believe that? Each of the previous years has included 24 cookies and this year will not be any different. I’ll share a new Christmas cookie recipe each and every single day for the next 24 days – even on Saturday and Sunday!
You might be asking yourself, how many Christmas cookie recipes could one possibly have or need? Well, I say you can never have too much of a good thing. And, I love having lots of choices. Who wants to bake the same holiday cookies year after year?
So, welcome, Dear Reader, to Volume 5 of Lord Byron’s 24 Cookies of Christmas! Fresh off of my 12 Edible Wreaths of Christmas and my 12 Bars and Squares of Christmas series, I’m ready to plow through the next 24 days with you!
You really don’t want to miss one of these recipes, so if you have not yet subscribed to Lord Byron’s Kitchen, I encourage you to do so. That way, a new recipe will be emailed to you every day. You won’t have to bother to come looking for it! Like in previous holiday baking countdowns, I like to mix up the recipes in the series so that there is something for everyone. Are you ready!!??
Looking For More Christmas Confections?
Lord Byron’s Kitchen has more than enough to satisfy your sweet tooth! Click on the links below to see a countdown series of holiday recipes from that category!
INGREDIENTS NEEDED TO PREPARE THIS RECIPE
The following is a list of the ingredients needed to prepare this recipe. For exact amounts and measurements, refer to the printable recipe card located near the bottom of this post.
- Butter – Make sure your butter is at room temperature! To be perfectly honest, I have made these with both salted and unsalted butter and there’s no difference in taste or appearance once all is said and done. Use what you have on hand.
- Sugar – Sugar will caramelize when baked, which will help to brown cookies and cakes. In cookies, the sugar will help the dough to spread and will create a crispness to the bottom of the cookie.
- Peppermint Extract – We’re going to pack as much peppermint flavour as possible into these cookies!
- Vanilla Extract – Probably the most common extract and the most common flavouring used in cakes and cookies. The vanilla will tame the peppermint. If you want more peppermint flavour, omit the vanilla and substitute it with more peppermint extract.
- Baking Powder – This is used to increase the volume of the batter and to add texture as well.
- Salt – Do not add the extra salt if you used salted butter!
- Eggs – Whenever you set out to bake, make sure your eggs are at room temperature too – just like your butter!
- Flour – No need for anything special. Just use regular all-purpose flour. I have not tried this recipe with any other type of flour.
- Red Food Colouring
- Water
- Sanding Sugar – Coarse sugar, sometimes referred to as sanding sugar, is used sometimes for decorative purposes. It is sometimes called pearl sugar or coarse baking sugar.

SANDING VS GRANULATED SUGAR
I use coarse sanding sugar quite often in my recipes, and I hope it hasn’t been too difficult for you to find. Sanding sugar is sometimes referred to as baking sugar, and there are some substitutes. You can use other sugars – which are basically the same, but named something differently – there’s pearl sugar and coarse sugar. You cannot, however, use granulated sugar. Let me explain why.
Whereas an individual granule of sanding sugar is large and hard, a single granule of granulated sugar is quite small. Sanding sugar will hold up to the heat in your oven without melting; granulated sugar will not. If you cannot find sanding sugar, you can either skip it completely for this recipe, or you can dust the top of your snowballs with confectioner’s sugar once they’ve completely cooled.
You can find sanding sugar online, but it’s expensive in comparison to what you can find at a baking supply store. I buy most of my sanding sugar at Bulk Barn. They have just about every colour you will need! You can also use turbinado sugar. Turbinado sugar is a golden brown though, so it will throw off the colour of your finished cookie.
Do you have a question or comment?
Would you like to leave a review?
Scroll down to the comment section and write me a message.
I will personally respond as soon as possible!
FOOD COLOURING
Before I get too far into this, I am just going to get this one thing out of the way. Yes, I did use food colouring to dye the cookie dough. Using food colouring is not ideal for some people, but I don’t personally have an issue with it. I know there are many “natural” ways of colouring food, so if you already employ those in other recipes, feel free to do so here too.
I have used only red. The white part of the cookie is made up of the cookie dough before any red food colouring is added to it. Together, they will give you that red and white collaboration that is synonymous with candy canes.
I usually preach that using the gel type of food colouring is best, however, in this case, the liquid is much better. Normally, I would tell you that the gel will allow you to tint the cookie dough without changing the viscosity of the dough and that you may have to use too much of the liquid colouring to get the dough tinted enough. I have found that liquid works much better to get that nice red colour. Gel just turns the dough pink.
Lord Byron’s Annual Christmas Cookie Series
Did you know that Lord Byron’s Kitchen has been sharing a 24 Cookies of Christmas Series for the past several years? Click on the links below to see all of the recipes from each series on one page!
HOW TO MAKE PEPPERMINT CANDY CANE COOKIES
1. Preparing the Dough
This cookie dough requires a minimum of 3 hours of chilling time, so please take that into account before making these. Also, the text that follows might make the recipe seem cumbersome and complicated, but it really isn’t. There are a lot of steps, but they are quick and easy steps, so let’s do it!
Measure the butter, sugar, peppermint extract, vanilla extract, baking powder, and salt into a large mixing bowl or into the bowl of your stand mixer. Beat the ingredients together until a paste forms. You will know it’s done when the dough clings to the side of the bowl.
Next, beat in the egg. Add the flour and beat until just combined. Divide the dough in half. Leave one half in the bowl and form a disk with the other half, wrap it in plastic wrap and refrigerate it. To the half in the bowl, add the red food colouring. Carefully beat it into the dough until incorporated and the dough turns a bright red. Form a disk with this dough, wrap it in plastic wrap, and refrigerate it as well. Refrigerate for a minimum of 3 hours.

2. Assembly and Baking
When ready to bake, line a baking sheet with parchment paper and set aside. Whisk the egg white and water in a bowl and set aside. Preheat your oven to 350 degrees F. Remove the dough from the fridge and unwrap it.
Pinch off two tablespoons of dough from the white and two tablespoons from the red dough. Roll each colour individually into an 8-9 inch log. With one red and one white roll laying next to each other, twist them to form a spiral effect. Place it onto the prepared baking sheet and bend the top half down to create a hook or cane shape.
Repeat this action until you have prepared enough candy canes to fill the baking sheet, being sure to leave 2 inches of space between each one. Brush the canes lightly with the egg and water mixture. Sprinkle over some of the sanding sugar.
Bake in your preheated oven for 8 minutes or until the edges are slightly brown. Allow the cookies to cool on the baking sheet for 10 minutes before transferring them to a wire cooling rack to finish cooling. Once cool, stack in a cookie tin and keep at room temperature.

STORING, PACKAGING, & FREEZING
When it comes to most cookies, they taste best at room temperature, but they don’t hold up well to being left out on your countertop for long periods of time. Cookies will stay fresh in a cookie jar or food-safe container with a lid for 3-5 days if left to sit on your kitchen countertop. You can store them in a food-safe container in your fridge. When you want one, two, or half a dozen, take them out of the container and place them in a single layer on a plate. Let them sit at room temperature for 5 minutes and they’re ready!
If you plan to freeze your Peppermint Candy Cane Cookies, you certainly can! Once completely cooled, pile them into a clean, food-safe container. The container must be freezer friendly! You’ll want to ensure a very tight-fitting lid too. I use these quite often when freezing baked goods. I like to place a sheet of plastic wrap over the top of the container before pushing the lid on. This helps to create a better seal. The goal is to keep all of that freshness locked in!
You can freeze these cookies for up to three months. If you plan to give previously frozen cookies as a gift, I would lay them out on a wire cooling rack to thaw completely. If packaging, wait until the condensation has evaporated. Once thawed, pile into cellophane bags and tie with a ribbon, or stack in a cookie tin/box.
QUESTIONS?
If I have not answered all of your questions in the text above, don’t hesitate to reach out to me! You can contact me by sending me a message in the comments section further down the page. I will try my best to answer as soon as possible! You might reach me even faster by following me on Facebook and sending me a private message. Please scroll down to follow me and never miss another recipe!
Finally, as I stated previously, every day I will be posting a new recipe. If you miss one, don’t fret. You can find my entire collection of Christmas Recipes right here! There are over 200 Christmas recipes and counting. There’s something for everyone! Cheers!

Do You Like This Recipe?
You should consider trying these other delicious recipes too!


Peppermint Candy Cane Cookies
Ingredients
- 1 cup butter, softened
- 1 cup sugar
- 1 1/2 teaspoons peppermint extract
- 1 teaspoon vanilla extract
- 1 teaspoon baking powder
- 1/2 teaspoon salt (if you use salted butter, do not add the extra salt here)
- 1 large egg, room temperature
- 2 3/4 cups all purpose flour
- 1 teaspoon liquid red food colouring
- 1 large egg white, room temperature
- 1 tablespoon water
- 2 tablespoons white sanding sugar
Instructions
- Measure the butter, sugar, peppermint extract, vanilla extract, baking powder, and salt into a large mixing bowl or into the bowl of your stand mixer. Beat the ingredients together until a paste forms. You will know it’s done when the dough clings to the side of the bowl.
- Next, beat in one large egg.
- Add the flour and beat until just combined.
- Divide the dough in half. Leave one half in the bowl and form a disk with the other half, wrap it in plastic wrap and refrigerate it.
- To the half in the bowl, add the red food colouring. Carefully beat it into the dough until incorporated and the dough turns a bright red. Form a disk with this dough, wrap it in plastic wrap, and refrigerate it as well. Refrigerate for a minimum of 3 hours.
- When you are ready to bake, line a baking sheet with parchment paper and set aside. Whisk the egg white and water in a bowl and set aside. Preheat your oven to 350 degrees F.
- Remove the dough from the fridge and unwrap.
- Pinch off two tablespoons of dough from the white and two tablespoons from the red dough.
- Roll each colour individually into a 8-9 inch log.
- With one red and one white roll laying next to each other, twist them to form a spiral effect.
- Place it onto the prepared baking sheet and bend the top half downward to create a hook or cane shape.
- Repeat this action until you have prepared enough candy canes to fill the baking sheet, being sure to leave 2 inches of space between each one.
- Whisk together the large egg white and water. Use a pastry brush to lightly brush the canes lightly with the mixture.
- Sprinkle over some of the sanding sugar.
- Bake in your preheated oven for 8 minutes or until the edges are slightly brown.
- Allow the cookies to cool on the baking sheet for 10 minutes before transferring to a wire cooling rack to finish cooling.
- Once cool, stack in a cookie tin and keep at room temperature.
Nutrition
Did you make this recipe?
Upload a photo and tag me so that I can see it!


Becky says
They look perfect! Mine always come out flat and wide