
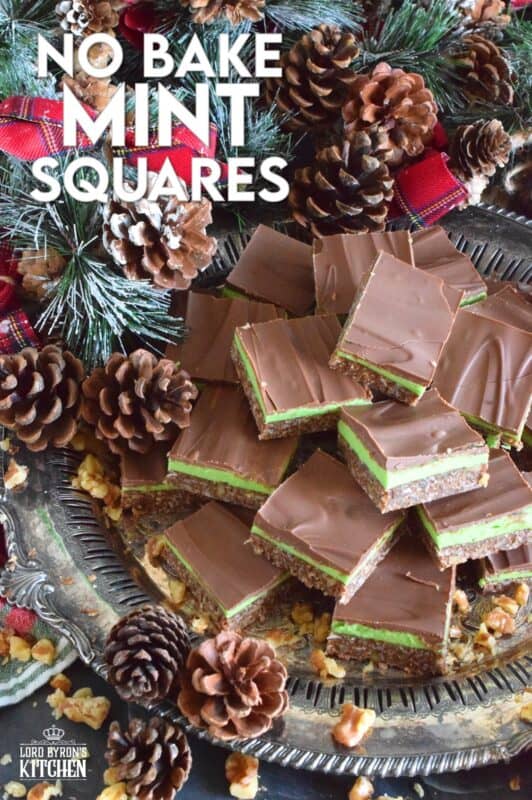
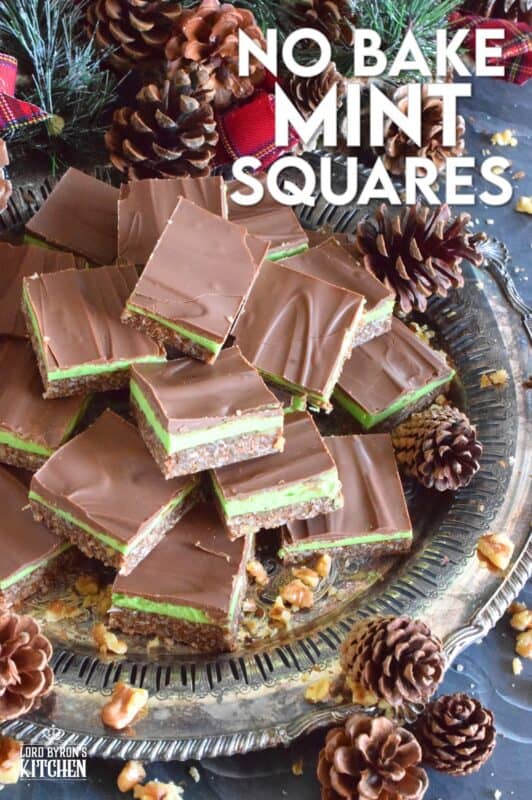
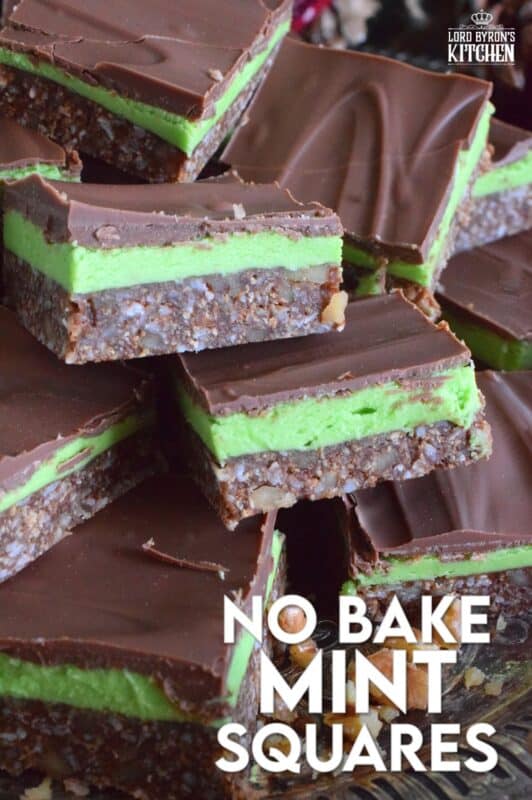
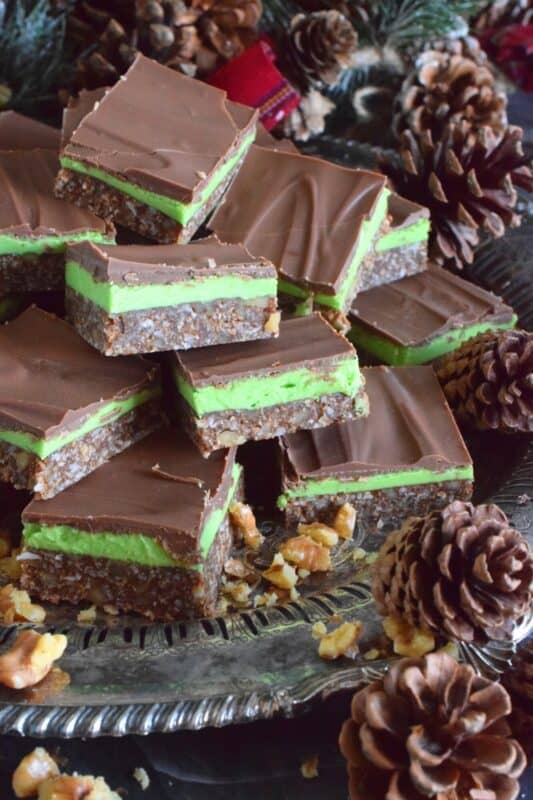
Triple-layered with wonderful flavours, these No Bake Mint Squares are perfectly festive for the holiday season. With a coconut, walnut, and graham crumb base, and a creamy mint filling, these squares are topped with melted chocolate which makes them all the more rich and delicious. You simply must add these to your Christmas cookie platter!
I cannot tell you how many of these I ate in my childhood. My Aunt Beryl used to make these almost every weekend. She was well-known for being one of the town’s best bakers. In fact, I remember one time, she baked about 1500 cookies, consisting of many varieties, for a wedding dessert table! She called her version Mint Squares and so did my mom. But, I call them No Bake Mint Squares because I want to emphasize just how easy they are to prepare!
Make your own online recipe box!
Click the in the lower right corner of your screen
& follow the quick and easy instructions!
Growing up, it was a very common practice for us to go to church three times a day on Sundays. We were Apostolic and there was a Sunday morning church service, followed by Sunday School for the kids in the afternoon, and then a Sunday night service as well. The nighttime service was better attended and I looked forward to that one. I hated going to church on a Sunday morning. I felt that the sermon was always aimed at older people, and with there being a smaller congregation, it was rather boring.
Another reason I favoured the evening service was that I knew as soon as it was over, my family and I would head to my Aunt Beryl’s house. She would always serve what could be considered a full meal even though it would have been close to 10 pm when we arrived. There were always leftover cold plates that she would serve. And, then came the sweets! She would have various sweets including coconut cream pie, caramel logs, snowballs, and of course, mint squares! It’s no wonder I looked forward to church on Sunday night!

LORD BYRON’S 12 BARS AND SQUARES OF CHRISTMAS
No Bake Mint Squares are the ninth confection in my new series! Yes, that’s right, Dear Reader! I’m kicking off another holiday baking series, just like I have for the past few Christmases! Welcome to Lord Byron’s 12 Bars and Squares of Christmas!!!
If you have been reading my blog for while – well, at least anytime around Christmas for the past few years – you must have run into at least one of my Christmas baking countdowns. This particular countdown is all about bars and squares. For 12 consecutive days, I will share a holiday-based bar or square recipe with you. That means on Saturday and Sunday too! I usually publish new recipes three times a week, so I hope you’re up for this!
You really don’t want to miss one of these recipes, so if you have not yet subscribed to Lord Byron’s Kitchen, I encourage you to do so. That way, a new recipe will be emailed to you every day. You won’t have to bother to come looking for it! Like in previous holiday baking countdowns, I like to mix up the recipes in the series so that there is something for everyone. There will be bars and squares with chocolate, some with candy, and some with nuts too. Are you ready for day 9!!??
Looking For More Christmas Confections?
Lord Byron’s Kitchen has more than enough to satisfy your sweet tooth! Click on the links below to see a countdown series of holiday recipes from that category!
NO-BAKE RECIPES
I used to think that the term no-bake meant that a recipe was more of an assembly-type recipe. Something like a salad, for example. It sounds simple enough, right? Toss the lettuce and any other veggies you want into a bowl. Top it with cheese, croutons, avocado, hard-boiled egg, etc. Add some dressing and you’re all done! But, no-bake actually just means no baking. There still might be some stove-top cooking needed – or even a microwave, for that matter.
To prepare these No Bake Mint Squares, you will need to use your microwave. So, even though they’re no-bake and kid-friendly, you will still need some way to melt the chocolate.
Some other no-bake-type holiday recipes you might enjoy are these Rudolph’s Red Nose Cookies. Hairy Moose Droppings are delicious and always quite the conversation starter! Just like these Caramel Peanut Slices were a favourite of my mom’s so were these Marshmallow Coconut Balls and so were these Christmas Crunch Cookies. You can find many more no-bake cookie recipes here at Lord Byron’s Kitchen by using the search field at the top of this page.
INGREDIENTS NEEDED TO PREPARE THIS RECIPE
The following is a list of the ingredients needed to prepare this recipe. For exact amounts and measurements, refer to the printable recipe card located near the bottom of this post.
Base Layer:
- Salted Butter – Make sure your butter is softened and at room temperature! I always use salted butter, unless stated otherwise. If you use unsalted butter, add 1/4 teaspoon of salt when you add the flour and baking soda.
- Sugar – Sugar has more than one function in baking. Not only does it add sweetness, but it will caramelize too, which will help to brown cookies and cakes.
- Cocoa Powder – Cocoa powder is an unsweetened chocolate product which adds deep chocolate flavour to desserts and beverages. Use a good quality cocoa powder, not the kind we used to stir into milk as kids!
- Vanilla Extract – Probably the most common extract and the most common flavouring used in cakes and cookies.
- Eggs – Whenever you set out to bake, make sure your eggs are at room temperature too – just like your butter!
- Milk – When a baking recipe requires milk, I always use whole milk, unless otherwise stated.
- Walnuts
- Coconut – Be sure to buy the right type of coconut. Read the next section for more details.
- Graham Crumbs – I always try to find the crumbs rather than using the wafers. It just saves me from dirtying up my food processor. Don’t use a cheap, no-name brand. If you can afford the extra dollar, buy a good brand. Personally, I prefer Keebler brand, but they’re really hard to find in Canada, so my second choice is Honey Maid.
For the Middle Layer:
- Confectioner’s Sugar – This superfine sugar is sometimes called powdered sugar. It is used in frostings quite often.
- Custard Powder – Custard powder is primarily made up of thickeners that give the pudding its texture. More about this ingredient in the next section.
- Butter
- Peppermint Extract
- Green Food Colouring
- Milk
Top Layer:
- Chocolate Chips – I use chocolate chips a lot in my recipes, and I change up the type depending on how I feel. Unless the recipe states otherwise, you can use milk, semi-sweet, or dark chips. In this particular case, milk chocolate just seems to work better.
- Butter
FOOD COLOURING
Before I get too far into this, I am just going to get this one thing out of the way. Yes, I did use food colouring to dye the creamy mint layer. Using food colouring is not ideal for some people, but I don’t personally have an issue with it. I know there are many “natural” ways of colouring food, so if you already employ those in other recipes, feel free to do so here too.
Using the gel type of food colouring is best in this case. The gel will allow you to tint the cream filling without changing its viscosity. You may have to use too much of the liquid colouring to get the cream tinted enough. Adding more than 8-10 drops of liquid colouring will change the firmness of the cream and may result in a thinner cream than desired.
If you’ve been reading Lord Byron’s Kitchen for any length of time, you will know that I’m a fan of gel food colouring. In fact, 99% of the time, I use Wilton brand gel in all of my recipes. I’m not sponsored at all by Wilton, but that particular brand is always reliable. When it comes to liquid food colouring, I trust the Club House brand to give me control over how much colour I want and it never disappoints when it comes to being vibrant.
HOW TO MAKE NO-BAKE MINT SQUARES
This no-bake recipe comes together quickly and easily. The first thing you should do is to prepare a 9 x 13-inch baking pan by lining it well with parchment paper. Fold the parchment paper so that it fits snugly in the pan. I use two sheets – one folded to fit the length of the pan and another folded to fit across the pan. Allow the excess parchment paper to hang out over the side of the pan. Once the confection is firm, use the excess parchment to lift the whole block out of the pan to make it easy to cut into bars.
Next, add the butter, sugar, cocoa powder, and vanilla extract to a medium-sized saucepan. Over medium heat, whisk the mixture together. In a bowl, beat the egg and milk together. Add this the egg and milk mixture to the saucepan and whisk well to combine. Continue to heat until the mixture comes to a low boil Remove from heat immediately.
Add the walnuts, coconut, and graham crumbs to the saucepan. Stir well to combine. Press this mixture into your prepared 9×13-inch baking dish. Be sure to get into the corners. Use the bottom of a drinking glass or mug to evenly press the mixture. Set this into your refrigerator to cool for 30 minutes while you prepare the middle mint layer.
Do you have a question or comment?
Would you like to leave a review?
Scroll down to the comment section and write me a message.
I will personally respond as soon as possible!
PREPARING THE DELICIOUS CREAMY MINT MIDDLE LAYER
This is really quite simple. Add all of the ingredients for the middle layer to a mixing bowl and whisk to combine. The mixture should be really thick, but thin enough to spread over the base. Don’t be tempted to add more liquid if the cream looks too thick. If you do, the cream might not set and may ooze out of the squares when you attempt to slice them.
Once the base layer has cooled in your fridge for 30 minutes, remove it and spread the mint layer evenly over the surface. I like to use an offset spatula to get it as evenly spread as possible, but it’s not something to fret about. If you fuss with it too much, you might end up pulling up sections of the base and mixing it into the green filling. It’s not the end of the world, but your squares won’t look as clean. Once you’ve finished applying the filling, pop the baking pan back into the fridge until the chocolate layer is ready to go.
Lord Byron’s Annual Christmas Cookie Series
Did you know that Lord Byron’s Kitchen has been sharing a 24 Cookies of Christmas Series for the past several years? Click on the links below to see all of the recipes from each series on one page!
PREPARING THE CHOCOLATE TOP LAYER
Here’s how to get the chocolate just right. Place the chocolate and butter into a microwave-safe bowl. Whenever you microwave chocolate, you should microwave it on high power for 30 seconds. Then, if it’s still not silky smooth, microwave in increments of 5 or 10 seconds, depending on your microwave, stirring with a rubber spatula after each increment.
Once the chocolate is completely smooth, once again fetch the mint squares from the fridge and pour over the chocolate and spread into an even layer. Leave the baking pan to cool at room temperature for 20 minutes before transferring it to your fridge to cool for an additional 60 minutes.
Once cooled, cut into squares. Store the squares in an airtight, food-safe container and keep them refrigerated. Squares will last 5-7 days in the fridge. Additionally, the squares can be frozen for up to 3 months!

WHAT IS CUSTARD POWDER?
Custard powder is not an ingredient used often. It tends to be more popular in UK and in Australian baking. Contrary to popular belief, custard powder is not the result of dried custard that has been crumbled to a powder. It is actually a powdered mix used to make a custard, and it is very similar to the type of mix used to make an instant pudding like the type found in pouches or boxes in North American grocery stores. Custard powder can be easily combined with milk and cooked on the stove until thickened. Once cooled you have custard, most commonly called pudding.
Custard powder is primarily made up of thickeners that give the pudding its texture. Cornstarch is usually the biggest component since it is great for thickening liquids and dissolves easily. The powder also contains flavourings, vanilla being the standard, and a hint of yellow colouring. Yellow colouring gives the custard just enough colour to look as though there are plenty of eggs in it, as most basic custards are thickened with eggs instead of powder.
You can find custard powder at some specialty markets and some markets that specialize in imports from other countries. If you’re travelling abroad, you should be able to find it pretty easily. Bird’s brand is probably the biggest name in the game of producing and supplying custard powder. If you cannot find it, you can substitute it with equal amounts of dry vanilla pudding mix from an instant mix box.
COCOA POWDER
Cocoa powder is an unsweetened chocolate product which adds deep chocolate flavour to desserts and beverages. Use a good quality cocoa powder, not the kind we used to stir into milk as kids! I have two types of cocoa that I use when baking. In cookies like these Hot Chocolate Cookies, just a regular, inexpensive cocoa powder will do just fine. Even though I don’t care for Hershey’s chocolate, I do like to use Hershey’s cocoa powder for cookies.
If, however, I’m making a cake or a cookie recipe with very few ingredients, I want to use better quality cocoa powder. For me, Fry’s Premium Quality Cocoa has all that I’m looking for. It has a stronger chocolatey scent than other cocoa powders. When it comes to flavour, Fry’s wins out again. The only thing that Fry’s doesn’t offer is a deeper, chocolatey colour like you see in the photos. I find that Hershey’s does a better job in terms of colour.
WORKING WITH GRAHAM CRACKERS
If you already have graham crackers on hand, there’s no need to buy graham crumbs. Using your hands, break the crackers into smaller pieces, adding them to the bowl of a food processor as you go. Pulse the crackers a few times until the mixture resembles sand. You might be tempted to pour the melted butter in too, but do not do it!
Pulsing the crumb mixture with the butter will result in a very fine crumb, and your base will have very little texture. You run the risk of the mixture being too soft or runny to form into an even crumb crust.
GRAHAM CRUMB CONSISTENCY
There are really two options when it comes to making this No Bake Mint Squares recipe. You can purchase the graham crumbs. Or you can make your own crumbs from graham crackers. To be honest, both will do just fine, but if you choose to use crackers, you need to get the consistency just right.
Many bakers will place graham crackers in a bag and smash it with a rolling pin. That’s fine – if you want to spend your day banging a rolling pin onto your kitchen counter. You see, Dear Reader, the crumbs need to be fine in order for the cookie batter to level out properly while baking.

FAQ’s
- Do I have to use milk chocolate chips? No, you most certainly don’t! Personally, I prefer milk chocolate over semi-sweet or dark, but you can use whatever type you prefer.
- Can I use other extracts? Yes, you can. If you don’t have peppermint extract on hand, you can use vanilla extract instead. The squares will still taste great, but the peppermint flavour will not be there at all. If you prefer a different extract, use it! Tint the cream filling to match the flavour, just like one would do with Nanaimo bars!
- Can these squares be frozen? Yes, they certainly can! Once you cut them into squares, layer them into a food-safe, freezer-friendly container with a layer of parchment paper or waxed paper between each layer. You can freeze them for up to 3 months. To thaw, remove as many as you want from the container and place them on a plate. Leave at room temperature for 3-5 minutes and enjoy!
- I can’t find custard powder. Well, the good news is that you don’t have to use custard powder, because it can easily be substituted with equal amounts of dry vanilla pudding powder from the box!
STORING, PACKAGING, & FREEZING
Most no-bake confections are made without the need to freeze them for long periods of time, but they can be frozen. For this recipe, I have tested whether or not they can be frozen, and they certainly can! Once they are completely firm, pile them into a clean, food-safe container. The container must be freezer friendly! You’ll want to ensure a very tight-fitting lid too. I use these quite often when freezing baked goods. I like to place a sheet of plastic wrap over the top of the container before pushing the lid on. This helps to create a better seal. The goal is to keep all of that freshness locked in! You can freeze these for up to three months.
Do You Like This Recipe?
You should consider trying these other delicious recipes too!


No Bake Mint Squares
Ingredients
Base Layer:
- 1/2 cup salted butter
- 1/4 cup sugar
- 2 tablespoons cocoa powder
- 1 teaspoon vanilla extract
- 1 large egg
- 1/4 cup milk
- 1 1/2 cups chopped walnuts
- 1 1/2 cups unsweetened coconut
- 2 cups graham crumbs
Middle Layer:
- 2 cups confectioner's sugar
- 2 heaping tablespoons custard powder
- 1/4 cup butter, softened
- 1 tablespoon peppermint extract
- 2-3 dabs green gel food colouring
- 3 tablespoons milk
Top Layer:
- 2 cups milk chocolate chips
- 2 teaspoons butter
Instructions
- This no-bake recipe comes together quickly and easily. The first thing you should do is to prepare a 9 x 13-inch baking pan by lining it well with parchment paper. Fold the parchment paper so that it fits snugly in the pan. I use two sheets – one folded to fit the length of the pan and another folded to fit across the pan. Allow the excess parchment paper to hang out over the side of the pan. Once the confection is firm, use the excess parchment to lift the whole block out of the pan to make it easy to cut into bars.
- Next, add the butter, sugar, cocoa powder, and vanilla extract to a medium-sized saucepan. Over medium heat, whisk the mixture together.
- In a bowl, beat the egg and milk together. Add this the egg and milk mixture to the saucepan and whisk well to combine. Continue to heat until the mixture comes to a low boil. Remove from heat immediately.
- Add the walnuts, coconut, and graham crumbs to the saucepan. Stir well to combine. Press this mixture into your prepared 9×13-inch baking dish. Be sure to get into the corners. Use the bottom of a drinking glass or mug to evenly press the mixture. Set this into your refrigerator to cool for 30 minutes while you prepare the middle mint layer.
- To prepare the middle mint layer, add all of the ingredients for the middle layer to a mixing bowl and whisk to combine. The mixture should be really thick, but thin enough to spread over the base. Don’t be tempted to add more liquid if the cream looks too thick. If you do, the cream might not set and may ooze out of the squares when you attempt to slice them.
- Once the base layer has cooled in your fridge for 30 minutes, remove it and spread the mint layer evenly over the surface. Once you’ve finished applying the filling, pop the baking pan back into the fridge until the chocolate layer is ready to go.
- Place the chocolate and butter into a microwave-safe bowl. Microwave it on high power for 30 seconds. Then, if it’s still not silky smooth, microwave in increments of 5 or 10 seconds, depending on your microwave, stirring with a rubber spatula after each increment.
- Once the chocolate is completely smooth, once again fetch the mint squares from the fridge and pour over the chocolate and spread into an even layer.
- Leave the baking pan to cool at room temperature for 20 minutes before transferring it to your fridge to cool for an additional 60 minutes.
- Once cooled, cut into squares. Store the squares in an airtight, food-safe container and keep them refrigerated. Squares will last 5-7 days in the fridge. Additionally, the squares can be frozen for up to 3 months!
Nutrition
Did you make this recipe?
Upload a photo and tag me so that I can see it!


Veronica says
JUST MADE THESE NY SUGGESTIONS HOW TO CUT INTO SQUARES AS MY FIRTS LITTLE TRY CRACKED THE TOPPING
TASTES AWESOME THO.
byronethomas@gmail.com says
Thank you. Place your knife under hot running water for a minute or so until the blade is hot. Wipe clean and use the hot knife to cut. It will slice right through the chocolate and limit the cracking.
Melodee says
I made these!!!! but I just added one more thing to make them extra 😂😂 I chopped up 4 mint chocolate aero bar’s on top of the chocolate before it set 😊 The recipe is perfect thankyou for sharing!! 🥰