
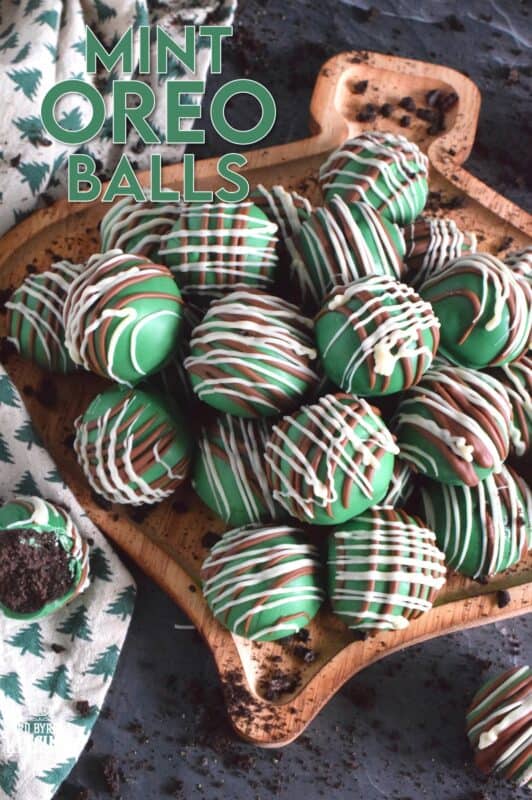
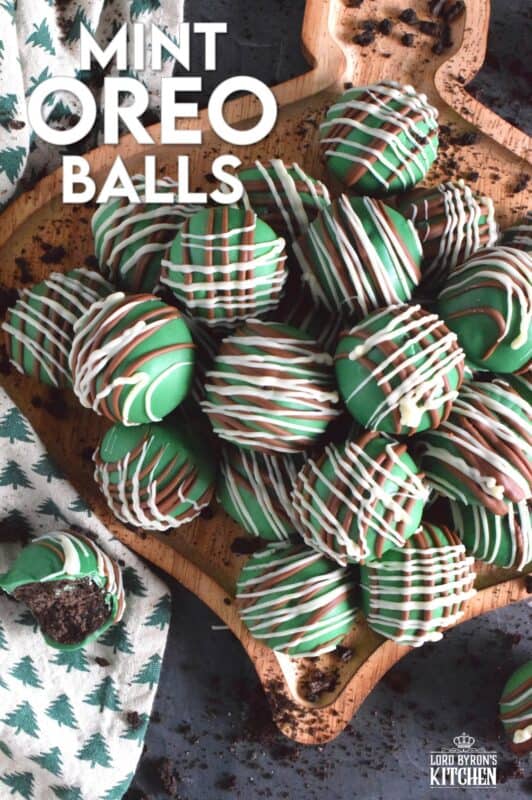
Otherwise known as truffles, these Mint Oreo Balls are prepared with crushed mint-flavoured Oreos and cream cheese. They are dipped in melted green candy melts and drizzled with milk and white melted chocolate. They’re bright, beautiful, festive, and delicious!
Last Christmas, I experimented quite a bit with truffles made from items one can find from any local bakery. In fact, I shared an entire truffle series called Lord Byron’s 12 Truffles of Christmas series. These Mint Oreo Balls, however, did not get included in last year’s series only because I had to limit the series to 12. I promised myself that I would get them out to you this year, so here they are!
Make your own online recipe box!
Click the in the lower right corner of your screen
& follow the quick and easy instructions!
I could not stop eating these! As you know, most of the items I bake around Christmastime are packed up and given away. It just so happened that the day I photographed these the siding on our home was being replaced. I packed up four bags of cookies and tossed in a few of these balls too. I could not bare to give them all away, because they were just too good! Even now, as I write this, there are a few stashed away in the freezer, but I buried them down deep, so I’m less inclined to go digging for them.
I’ve said it before and I’ll say it again – making balls (or truffles if that is what you want to call them) is so easy, which is probably why they are so popular. Their popularity only increases around Christmastime, when people start to indulge a little more, have more visitors dropping by, and spend less time baking elaborate confections. That is why Mint Oreo Balls fit perfectly into this Snacks and Treats Series.

LORD BYRON’S 12 SNACKS & TREATS OF CHRISTMAS
Another holiday series, Lord Byron? Yes – why not!? Welcome, Dear Reader, to my last Christmas series this holiday season! I’m calling this series Lord Byron’s 12 Snacks & Treats of Christmas. Unlike the 24 Cookies of Christmas series that ended a few days ago, this series will focus on easy-to-make snacks and treats that are both delicious and festive.
I will try to keep the recipes in this series quick and easy too. Most of them will require the help of a microwave rather than an oven. And, a bunch of them will involve more assembly-type tasks rather than preheating, beating, whipping, etc.
Just like every other series that I’ve shared here, this series will also see a new snack or treat recipe shared with you, Dear Reader, each and every single day for the next 12 days – even on Saturday and Sunday! You might be asking yourself, how many Christmas recipes could one possibly have or need? Well, I say you can never have too much of a good thing. And, I love having lots of choices. Who wants to prepare the same holiday snacks and treats year after year?
Looking For More Christmas Confections?
Lord Byron’s Kitchen has more than enough to satisfy your sweet tooth! Click on the links below to see a countdown series of holiday recipes from that category!
SUBSCRIBE NOW SO THAT YOU NEVER MISS OUT ON NEW RECIPES!
So, welcome, Dear Reader, to Lord Byron’s 12 Snacks & Treats of Christmas! Fresh off of my 12 Edible Wreaths of Christmas, my 12 Bars and Squares of Christmas series, and Volume 5 of my annual 24 Cookies of Christmas series, I’m ready to plow through the next 12 days with you once again.
You really don’t want to miss one of these recipes, so if you have not yet subscribed to Lord Byron’s Kitchen, I encourage you to do so. That way, a new recipe will be emailed to you every day. You won’t have to bother to come looking for it! Like in previous holiday recipe countdowns, I like to mix up the recipes in the series so that there is something for everyone. Are you ready!!??
INGREDIENTS NEEDED TO PREPARE THIS RECIPE
The following is a list of the ingredients needed to prepare this recipe. For exact amounts and measurements, refer to the printable recipe card located near the bottom of this post.
- Mint Oreos – You will need two packages of Mint Oreos.
- Cream Cheese – When baking with cream cheese it is always best to use brick style rather than whipped or cream cheese in a tub. The brick style is firmer and more condensed. Cream cheese adds texture and flavour to baked items.
- Green Candy Melts – When it comes to candy melts there are different shades of green. My choices were limited this year so it was this dark green one or a very light, lime-coloured candy melt. I chose the darker green colour.
- Milk Chocolate Chips
- White Chocolate Chips
WHAT ARE CANDY MELTS?
Candy melts are small, round discs that are made to emulate white chocolate. They come in a wide range of colours and are usually melted down and used in confections such as the coating on cake pops. I think the term candy melts is owned by Wilton, which is the only type I’ll use.
I use Wilton’s because I have used the brand many times before and have never been disappointed, but also because they have a lot of different colours to choose from. Oh, and the price is always good too!
If you cannot find candy melts, you can either order them online here, or you can use generic brands that can be found at your local baking supply store. The generic brands are sometimes called melting wafers. Additionally, if you cannot find them or do not want to use them, you can dip your Mint Oreo Balls into melted white, milk, semi-sweet, or dark chocolate.

THE BEST WAY TO COAT TRUFFLES IN CHOCOLATE!
I used to think that perfectly dipped chocolate truffles were witchcraft! Of course, I’m kidding, but honestly, I could never master it. Either the chocolate was too thick, or not smooth enough. And, I was always left with a pool of chocolate at the bottom of the truffle that would harden. There’s nothing wrong with extra chocolate, but I so badly wanted to make my Mint Oreo Balls look better.
I tried that fancy little tool for dipping things into chocolate. It’s like a two-tined fork with really long tines. Apparently, the truffle is supposed to balance on there, while the thin tines allow the excess chocolate to drip off. Lies! There is no fancy tool needed to get perfect chocolate-dipped truffles. All you need is melted chocolate with a good consistency and two toothpicks. Here’s how I do it.
If you use melting chocolate right out of the bag, like candy melts or chocolate chips, for example, you will end up with very thick chocolate. The thicker the chocolate, the longer it will take to harden, which means more time for it to run. Thin your chocolate by adding a teaspoon of vegetable shortening to the bowl before you start to melt it. This will thin it without any risk of your chocolate seizing or compromising the flavour. If you’re using candy melts, add one and a half teaspoons of vegetable oil.
Lord Byron’s Annual Christmas Cookie Series
Did you know that Lord Byron’s Kitchen has been sharing a 24 Cookies of Christmas Series for the past several years? Click on the links below to see all of the recipes from each series on one page!
HOW TO MAKE MINT OREO BALLS
The first step is to ensure that your cream cheese is at room temperature. So, before you start anything else, allow your cream cheese to sit on your kitchen counter for about 30 minutes. Once that’s done, add all of your Oreos to a food processor and pulse until you are left with a crumbly mixture that resembles wet sand.
Add in the cream cheese and pulse until it is well incorporated into the crushed Oreos. You should see no white cream cheese at all! Transfer the mixture to a bowl. Cover and refrigerate it for 30 minutes. Once chilled, remove the mixture from your fridge and roll it into one-inch balls. Place the balls onto a parchment-lined baking sheet and refrigerate for 60 minutes.
Once chilled, it’s time to melt the candy melts. Add the candy melts (or chocolate chips) to a microwave-safe bowl. Add in one and a half teaspoons of vegetable shortening (only one teaspoon if you’re using chocolate chips) and microwave on medium speed for 30 seconds. Remove the candy melts from the microwave and stir well with a rubber spatula. Microwave again for 30 seconds at half speed and stir well. Repeat this until the candy melts are melted and smooth.

COATING THE BALLS
Working with chilled balls, which I keep refrigerated until the candy melts are ready, insert a toothpick about 1/3rd of an inch into a ball. Dunk the ball into the bowl of melted candy melts and gently move the toothpick in a circular motion so that the entire ball is enrobed. Carefully lift the ball out of the bowl and lightly tap the toothpick on the rim. The excess will fall back into the bowl.
I cannot stress enough the importance of using a chilled ball. The coldness will help to harden the candy melts right away. The rest is just semantics! With a second toothpick, run it very gently under the ball to wipe away the excess candy melts. Do not press the toothpick against the ball; just wipe it against the dripping chocolate.
Next, transfer the ball to the prepared baking tray. Using the second toothpick, push it gently into the hole where the first toothpick is standing. Gently twist the first toothpick between your thumb and finger to loosen. Pull the toothpick up and out. Finally, remove the second toothpick, and use it to carefully smooth the candy melt coating over the hole.
Do you have a question or comment?
Would you like to leave a review?
Scroll down to the comment section and write me a message.
I will personally respond as soon as possible!
FINISHING TOUCHES
Return the Mint Oreo Balls to the fridge for 30 minutes. The candy melts will firm up and you’ll be able to touch the balls. I do recommend that you use food-safe latex gloves for this next step. Nobody wants to see fingerprints! Transfer the balls to a baking sheet that has been lined with parchment paper and a wire cooling rack.
Place the white chocolate chips and the milk chocolate chips into separate bowls. Following the same microwave melting technique as before, melt the chips until smooth. Transfer the melted chocolate chips to separate resealable sandwich bags. Working with one colour of melted chocolate at a time, cut a small tip from one lower corner. Hover the bag over the truffles and drizzle the chocolate in a zig-zag pattern. Repeat with the other melted chocolate.
Place the entire sheet pan in your fridge to firm up the chocolate. Leave them for at least 1 hour. Once firm, the Mint Oreo Balls can be transferred to a food-safe container or packaged. Keep the balls refrigerated.
STORING, PACKAGING, & FREEZING
When it comes to Mint Oreo Balls, they taste best at room temperature, but they don’t hold up well to being left out on your countertop. Store them in a food-safe container in your fridge. When you want one, two, or half a dozen, take them out of the container and place them in a single layer on a plate. Let them sit at room temperature for 5 minutes and they’re ready!
If you plan to freeze them, pile them into a food-safe, freezer-friendly container. You’ll want to ensure a very tight-fitting lid too. (I use these quite often when freezing baked goods.) I like to place a sheet of plastic wrap over the top of the container before pushing the lid on. This helps to create a better seal. The goal is to keep all of that freshness locked in! You can freeze these for up to three months. Enjoy!

QUESTIONS?
If I have not answered all of your questions in the text above, don’t hesitate to reach out to me! You can contact me by sending me a message in the comments section further down the page. I will try my best to answer as soon as possible! You might reach me even faster by following me on Facebook and sending me a private message. Scroll down to follow me and never miss another recipe!
Finally, as I stated previously, every day I will be posting a new recipe. If you miss one, don’t fret. You can find my entire collection of Christmas Recipes right here! There are over 200 Christmas recipes and counting. There’s something for everyone! Cheers!
Do You Like This Recipe?
You should consider trying these other delicious recipes too!


Mint Oreo Balls
Ingredients
- 2 packages Mint Oreos
- 8 ounces cream cheese, softened (use the block/brick style)
- 3 cups green candy melts
- 1.5 teaspoons vegetable shortening
- 1/2 cup white chocolate chips
- 1/2 cup milk chocolate chips
Instructions
- Place all of the Oreos into a food processor and pulse until the mixture is crumbly and resembles wet sand.
- Add in the cream cheese and pulse until it is well incorporated into the crushed Oreos. You should see no white cream cheese at all!
- Transfer the mixture to a bowl. Cover and refrigerate it for 30 minutes.
- Once chilled, remove the mixture from your fridge and roll it into one-inch balls. Place the balls onto a parchment-lined baking sheet and refrigerate for 60 minutes.
- Add the candy melts (or chocolate chips) to a microwave safe bowl. Add in one and a half teaspoons of vegetable shortening (only one teaspoon if you’re using chocolate chips) and microwave on medium speed for 30 seconds. Remove the candy melts from the microwave and stir well with a rubber spatula. Microwave again for 30 seconds on half speed and stir well. Repeat this until the candy melts are melted and smooth.
- Working with chilled balls, insert a toothpick about 1/3rd of an inch into a ball. Dunk the ball into the bowl of melted candy melts and gently move the toothpick in a circular motion so that the entire ball is enrobed. Carefully lift the ball out of the bowl and lightly tap the toothpick on the rim. The excess candy melts will fall back into the bowl.
- With a second toothpick, run it very gently under the ball to wipe away the excess candy melts. Do not press the toothpick against the ball; just wipe it against the dripping chocolate.
- Next, transfer the ball to the prepared baking tray. Using the second toothpick, push it gently into the hole where the first toothpick is standing. Gently twist the first toothpick between your thumb and finger to loosen. Pull the toothpick up and out. Finally, remove the second toothpick, and use it to carefully smooth the candy melt coating over the hole.
- Return the Mint Oreo Balls to the fridge for 30 minutes.
- Transfer the balls to a baking sheet that has been lined with parchment paper and a wire cooling rack.
- Place the white chocolate chips and the milk chocolate chips into separate bowls.
- Following the same microwave melting technique as before, melt the chips until smooth. Transfer the melted chocolate chips to separate resealable sandwich bags.
- Working with one colour of melted chocolate at a time, cut a small tip from one lower corner. Hover the bag over the truffles and drizzle the chocolate in a zig-zag pattern. Repeat with the other melted chocolate.
- Place the entire sheet pan in your fridge to firm up the chocolate. Leave them for at least 1 hour. Once frim, the Mint Oreo Balls can be transferred to a food-safe container or packaged. Keep the balls refrigerated.
Nutrition
Did you make this recipe?
Upload a photo and tag me so that I can see it!


Leave a Reply