
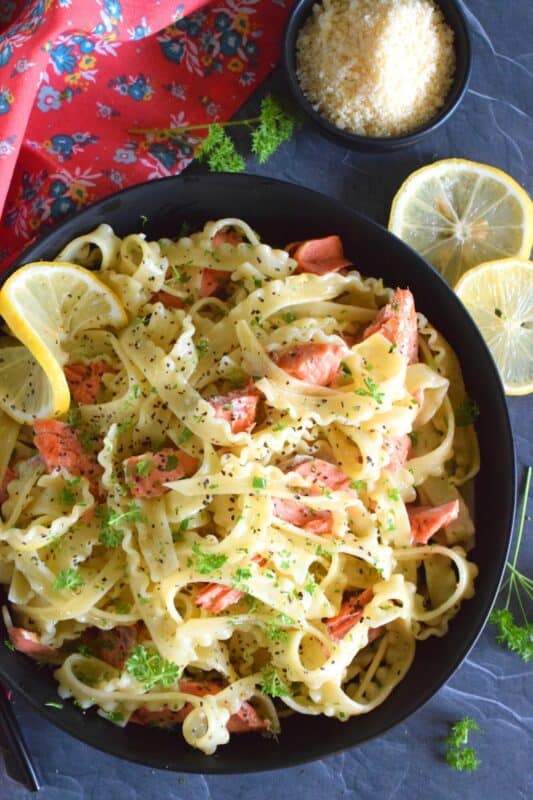
Salmon fillets are lightly seasoned and fried in butter until they are perfectly done. The salmon is gently flaked into bite-sized pieces and tossed with cooked pasta, lemon juice and zest, and lots of garlic. Fried Salmon Pasta is a beautiful and delicious main which takes less than 30 minutes from start to finish!

In our home, we all love salmon. To be perfectly honest, it is very rare that we all like the same thing. And, in the case that we do, it seems that we all like it to be prepared differently. Fried Salmon Pasta was one of those dishes that we all loved just the way it was. I’m surprised that we all like salmon equally, to be honest. Because seafood was not something John.e grew up with at all, and in my family home, salmon wasn’t cooked often. And, whenever salmon was prepared, it was almost always coated in flour and fried with pork fat.
Cod fish was probably the number one source of seafood protein in our family home. Living in Newfoundland, in a small fishing village, in the 80s, made sure of that. Cod was in abundance back in those days, and we ate it whenever we were presented with the chance. Actually, most people ate it whenever presented with the chance, but I was a little picky when it came to the preparation of fish.
First of all, everyone who knows anything about seafood at all, knows that seafood and fresh garlic are a match made in heaven. But, I can honestly say with 100% assurance that fresh garlic was never brought into my mother’s kitchen. And, cooking salmon with garlic and lemon was unheard of. Fish dishes from my mother’s kitchen were basic and home-style. I’m about to change that!
Make your own online recipe box!
Click the in the lower right corner of your screen
& follow the quick and easy instructions!
PREPARING SALMON
For most of us home cooks, salmon comes in the form of a whole side or fillets. Sometimes, we can find steaks too, but not too often. If you don’t know the terminology, let me walk you through it. A whole side of salmon is exactly what it says. The salmon has been cleaned and the side has been removed; hopefully bone free! In most cases, the skin is left on, which is the way I prefer it!
A salmon fillet is simple enough. The fillets are cut from the whole side of the salmon, usually in two to three-inch pieces. This is the most common cut. They’re great for frying or grilling. The whole side of salmon is hard to grill or fry, especially if you try to flip the whole thing onto the other side! In contrast, a salmon steak is a cross-sectional piece of the entire fish. It looks like a big letter U. This cut still has the bone in the middle. Again, this cut is great for frying or grilling.
For this recipe, I am using the whole side that I have cut into fillets. The skin is left on, which, in my opinion, is the best way! I don’t eat the skin, but I tend to like it left on the salmon, especially if I’m going to pan-fry it. Frying can be aggressive when it comes to a delicate fish like salmon. Leaving the skin on helps to keep the salmon together, especially when flipping it over!

LET’S FRY THE SALMON!
Frying salmon should not be intimidating. It’s actually quite easy! When I fry salmon, I prefer to have the skin on. No, I don’t eat the skin, but it does act as a security blanket for the fish. Most flaky seafood, like salmon, can easily fall apart when you cook it – especially if you have to flip it over! I find the skin helps to keep the salmon in one piece, and it looks prettier on the plate too! It is edible and some people do enjoy it!
The first thing I do is to lay the salmon skin side up onto a large plate. Season each piece well with some salt and pepper. Go easy on the salt! Remember that the salmon will be fried in salted butter, so you don’t want it to be too salty. Turn the salmon over and season the other side. The skin will now be facing up!
Once that is done, add the oil and butter to your skillet. Over medium heat, fry the salmon, skin side down, for 4 minutes. You might be tempted to move them with your flipper, but don’t do it. Let the skin sear and the salmon cook before attempting to move it or turn it. Otherwise, you might rip the skin or damage those lovely fillets!
Once the 4 minutes are up, flip them over and cook for another 4 minutes. Depending on how much salmon you are cooking, you might want to fry them in batches. Never overcrowd the pan! There should be at least an inch of space between each fillet.

INGREDIENTS NEEDED FOR THIS RECIPE
The following is a list of the ingredients needed to prepare this Fried Salmon Pasta recipe. For exact amounts and measurements, refer to the printable recipe card located near the bottom of this post.
- Salmon – I used one pound, which is about one whole side of salmon. You can use less or more. Halve the recipe or double it to suit your needs. If you are using frozen salmon, be sure the salmon is completely thawed!
- Pasta – You will need to cook your pasta in salted water. Once cooked, drain it and reserve half a cup of the pasta water for later.
- Butter – Seafood loves butter, so frying the salmon in butter makes perfect sense. I’m using salted butter.
- Olive Oil
- Garlic – Freshly minced garlic is best. You will get more flavour.
- Lemons – You will need a couple of lemons because the zest and juice are used in the recipe while lemon slices or wedges are used for serving.
- Salt and Ground Black Pepper
- Parsley
HOW TO MAKE FRIED SALMON PASTA
Salt and pepper the salmon on both sides. Add 2 tablespoons of salted butter and 1 tablespoon of olive oil to a skillet over medium heat. Fry the salmon skin side down for 4 minutes. Carefully flip the salmon over and fry for another 4 minutes. Once the salmon is cooked, remove it from the pan to a plate. Tent with aluminum foil and set aside.
Cook the pasta until al dente. Drain well, reserving ½ cup of the cooking water. While the pasta cooks, remove the skin from the salmon and discard. Gently flake the salmon into the desired size pieces.
Once the pasta is cooked and drained, add the remaining olive oil and butter to the skillet over medium heat. When the butter is melted, add the garlic and cook for 1-2 minutes. Next, add the lemon juice, lemon zest, and cooked pasta, along with the salt and ground black pepper. Using tongs, toss the pasta well until coated in the garlic and lemon mixture. Add in some of the reserved pasta water if needed. It will loosen up the pasta if it’s too thick and clumpy.
Finally, add the salmon and parsley. Gently toss to incorporate. Serve with lemon wedges.

COOKING PASTA
Let me talk to you a bit about how to get the pasta just right without overcooking it. Someone once told me that I prepare pasta like an old Italian grandma. That has stuck we me for so many years. You see, Dear Reader, I’m far from perfect, but cooking pasta is one thing I can certainly do perfectly. I don’t care what the back of the pasta package says, cook your pasta according to taste and texture. Ignore everything else. Here are my 4 steadfast rules:
Rule #1: Say no to oil!
Do you add oil to your pasta water before adding the pasta? Stop that right now! I don’t know who’s responsible for that, but I have seen some TV chefs do it! If you add oil to your pasta water, do you know what happens when you put the sauce on it? The sauce won’t stick as well as it should. It will slide off because the oil prevents it from sticking.
Rule #2: Add extra salt!
Salt the water. I used to be so afraid of salting pasta water because I thought it would be too salty to eat. Salting the water, before you add the pasta, is the only chance you get to season that pasta. Let the water come to a full boil before adding your salt. The water should taste like the ocean. Your version of this Artichoke and Sun Dried Tomato Pasta Salad will thank you! Don’t dump the salt in; stir it in. Preventing the salt from settling at the bottom of your pot will keep your pot looking shiny and new. If you have pots with what looks like a tarnished or unpolished interior bottom, it’s because salt sits at the bottom of your pot.
Rule #3: Get that pasta moving about immediately!
Stir the pasta for a good minute when you first add it to the water. This helps to wash off some of the starch and prevents the pasta from sticking to the pot and to itself. I always pull out a piece of pasta 4 minutes before the package says it will be ready. Taste it. Chew it. It shouldn’t be completely soft. If it has a bit of bite left in the center, get it out of the water and drain it immediately. You can thank me later!
Rule #4: Do not rinse!
So many of us are tempted to rinse pasta under running water after it’s been drained. I think it comes from the notion that it gets rid of the starch. Well, it does in a way. But, when pasta begins to cool off and dry, it becomes a little sticky. That stickiness soaks up pasta sauce, so don’t flush it out! A quick drain is all you need. Get the pasta into a bowl or onto a plate. Get the sauce on it and serve it up. (That all applies to hot pasta dishes, but for a pasta salad, go ahead and rinse. Get all of that starch off!)
HOW TO REHEAT LEFTOVER PASTA
Reheating leftover pasta is always a risk because overcooked pasta can easily become gluey and not very satisfying to bite into. Whenever you are reheating pasta that has a cream sauce the best way to combat a not-so-favourable texture is to add more fat. The same rule can be applied when reheating pasta tossed in butter, oil, and pasta water. Here’s how I do it.
Add a teaspoon of butter to a skillet with a splash of milk or water. Over medium heat, allow the butter to melt. Once melted, add the leftover pasta to the skillet and place a lid on it. Wait for 2 minutes and then use tongs to toss the pasta, loosening it up and mixing that melted butter into the pasta. If it’s still too dry, add another splash of milk or water and put the lid back on for another minute or two.
Toss again and continue to do this until the pasta is fully reheated and the sauce has transformed its way back to a glistening consistency. Plate, garnish, and get it into your belly!
Do You Like This Recipe?
You should consider trying these other delicious recipes too!


Fried Salmon Pasta
Ingredients
- 450 grams pasta, cooked according to package instructions, drained well, reserving 1/2 cup of the pasta water
- 1 pound salmon fillets, skin on
- 4 cloves garlic, minced
- 5 tablespoons salted butter
- 2 tablespoons olive oil
- 2 tablespoons lemon juice
- 1 tablespoon lemon zest
- 1/2 teaspoon salt
- 1/2 teaspoon ground black pepper
- 2 tablespoons parsley, finely chopped
Instructions
- Salt and pepper the salmon on both sides.
- Add 2 tablespoons of salted butter and 1 tablespoon of olive oil to a skillet over medium heat.
- Fry the salmon skin side down for 4 minutes. Carefully flip the salmon over and fry for another 4 minutes. Once the salmon is cooked, remove it from the pan to a plate. Tent with aluminum foil and set aside.
- Cook the pasta until al dente. Drain well, reserving ½ cup of the cooking water.
- While the pasta cooks, remove the skin from the salmon and discard. Gently flake the salmon into the desired size pieces.
- Once the pasta is cooked and drained, add the remaining olive oil and butter to the skillet over medium heat. When the butter is melted, add the garlic and cook for 1-2 minutes.
- Next, add the lemon juice, lemon zest, and cooked pasta, along with the salt and ground black pepper. Using tongs, toss the pasta well until coated in the garlic and lemon mixture. Add in some of the reserved pasta water if needed. It will loosen up the pasta if it’s too thick and clumpy.
- Finally, add the salmon and parsley. Gently toss to incorporate.
- Serve with lemon slices or wedges.
Nutrition
Did you make this recipe?
Upload a photo and tag me so that I can see it!


Faith Bahadurian says
I’ll happily take that salmon skin on the side, especially if it’s a bit crispy! It’s even featured in sushi rolls in some places. (I’m in New Jersey.)
Karen Culloty says
Can’t wait to try this gorgeous recipe. I love salmon and never thought to fry it! Right down my alley! Thanks